In this guide you build a workflow in Copilot Studio that puts an agent's text into your own Word template and saves the file on SharePoint. The agent writes the content, the workflow makes sure the document looks the same every time, and the user gets a link to the finished Word file in the chat.
The example is a decision memo for the management team of the fictional company Fjordbo Ventilation. The recipe is the same for a case summary, a board recommendation or a quote. It is the build I teach when people ask how to get an agent to produce a proper document and not only a chat answer.
What we build: From rough notes to a finished Word document
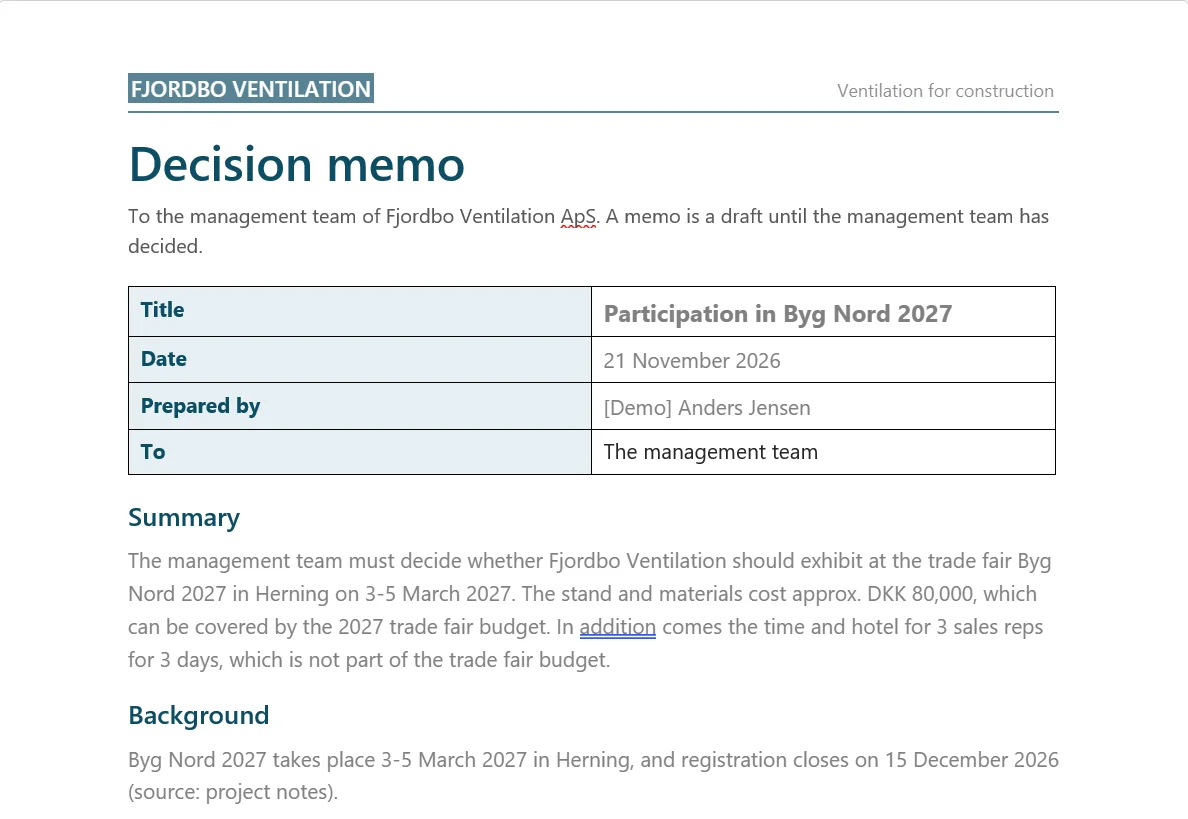
The sales manager at Fjordbo wants a stand at a trade fair and has to write a memo for the management team. She has four lines of notes. The agent turns them into a memo with six fixed sections, and the workflow puts the text into the management team's template. The solution has four parts:
- A Word template with one field for each section, stored on SharePoint.
- An agent with a skill that writes the memo in the same six sections every time.
- A workflow with five steps that fills the template, saves the file and sends a link back.
- Work IQ, which finally lets the agent find the numbers on SharePoint itself and prepare an email draft.
What you need
- Copilot Studio with Copilot Credits. On the Microsoft Copilot harness every test costs credits, even before the agent is published. How credits are bought and calculated is covered in the guide to Copilot Studio pricing.
- Word on the desktop. The fields in the template are created on the Developer tab, which Word for the web does not have.
- A SharePoint site with the template and a folder for the finished documents. In the example the site is called Ledelse, the Danish word for management.
- Connections to Word Online (Business) and SharePoint. Word Online (Business) is a premium connector, even though the designer shows no badge on the action. The workflow runs with the connections and permissions of the person using the agent, so each colleague needs access to the site and their own connections.
The harness was called the GitHub Copilot harness until 28 October 2026 and is now the Microsoft Copilot harness. What a harness is, is explained in The new Copilot Studio explained.
Step 1: Prepare the Word template with content controls
The workflow does not fill text like {{Title}}. It fills content controls, and it finds each of them by its title. This is how you create them:
- Open the template in Word on the desktop.
- Show the Developer tab: File, Options, Customize Ribbon, and tick Developer.
- Place the cursor where the field should be, for example under the heading Background.
- Click the Plain Text Content Control (Aa) on the Developer tab. The action does not fill the Rich Text control.
- Click Properties, and give the field a title, for example Background. Tick "Allow carriage returns" on fields with several paragraphs.
- Repeat for each field, and save as a regular .docx on SharePoint.
The template in the example has eight fields: Title, Summary, Background, Recommendation, Finances, Deadline, Date and Prepared by. The agent writes the first six. The workflow fills in Date and Prepared by itself.
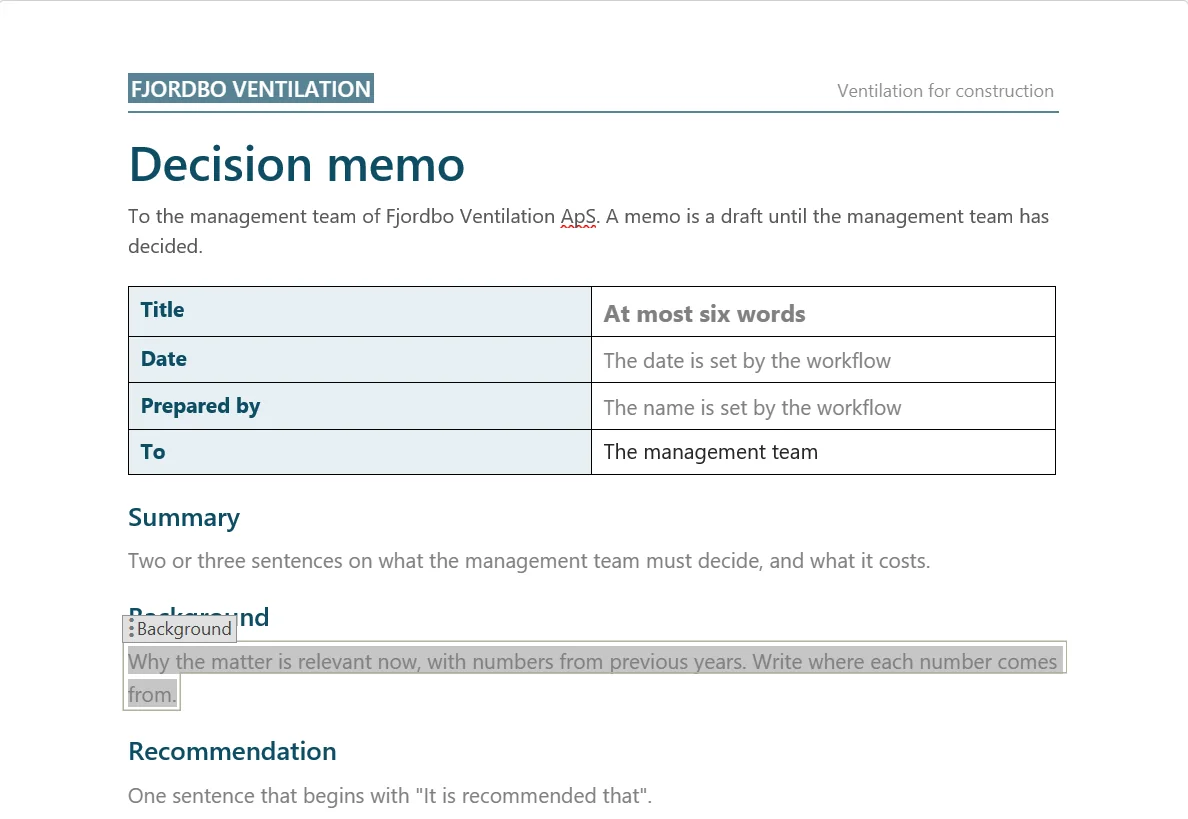
The font, colors and logo live in the template and carry over to every document. So if the agent's documents need a specific font, the template is where you change it. A longer walkthrough of content controls is in my video Automate Word Templates Like a Pro with Power Automate Desktop, where the fields are created the same way.
Step 2: Build the agent and the skill
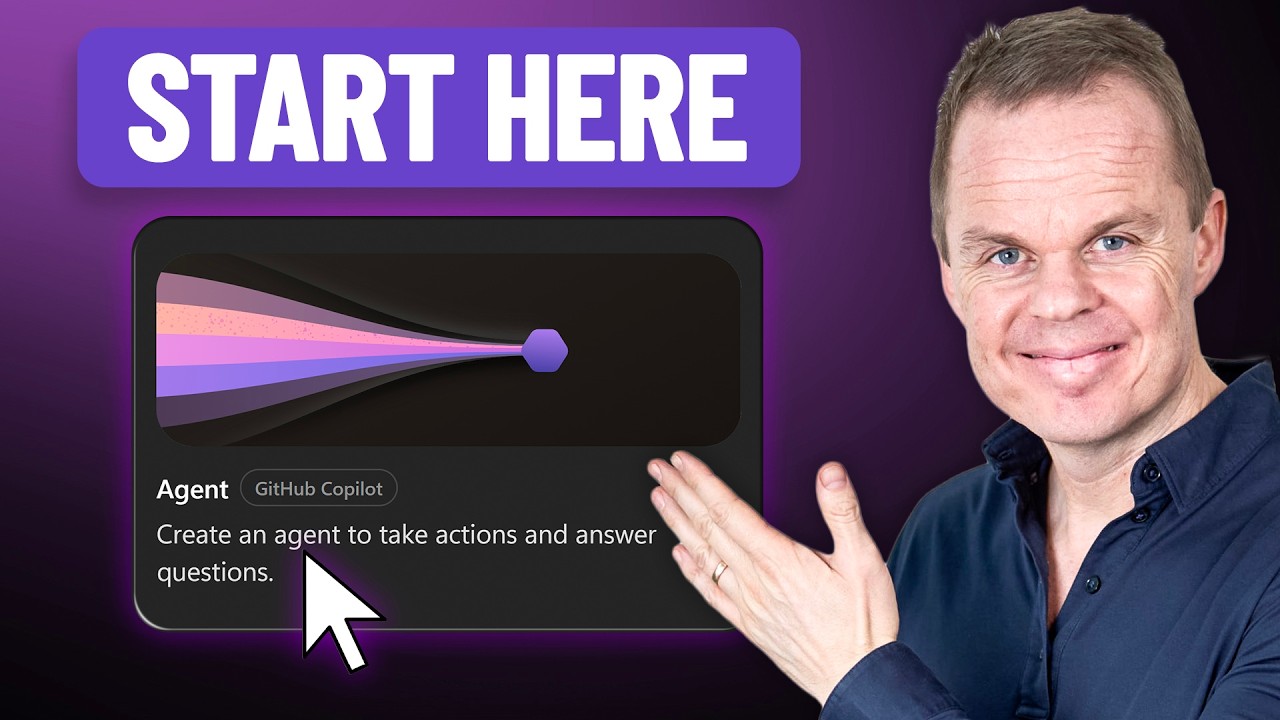
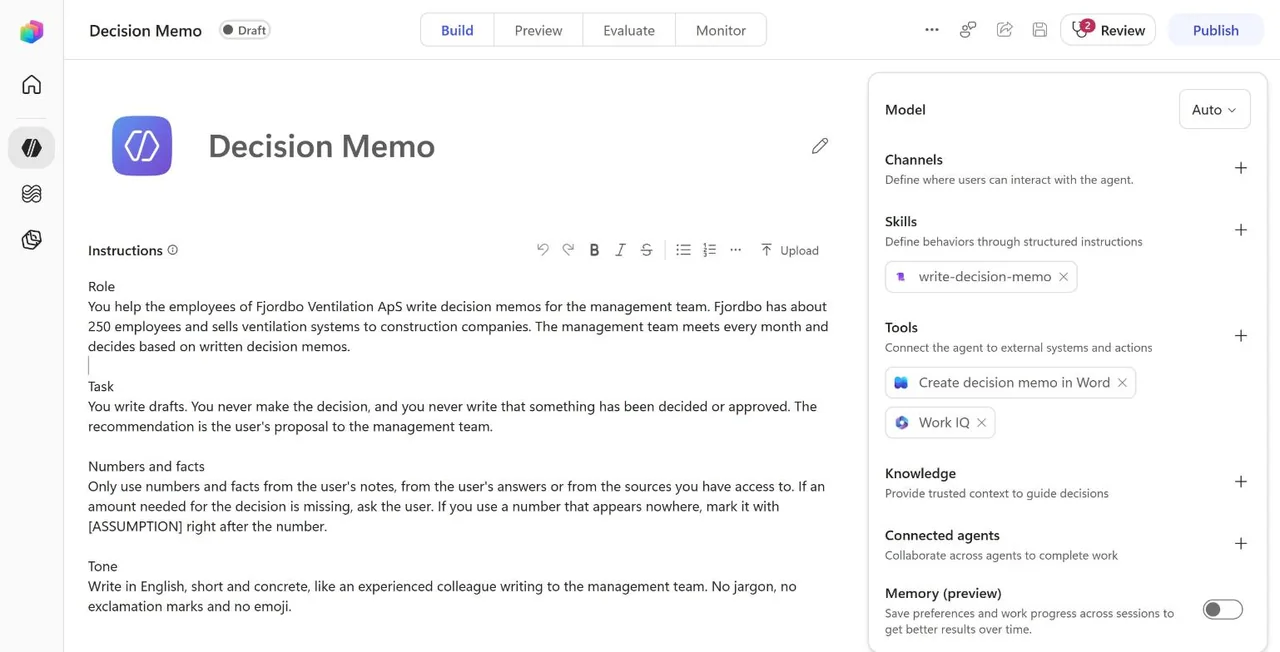
The agent is called Decision Memo and is created with the Agent card on the home page. The basic recipe with name, instructions and testing is covered in Build your first agent in the new Copilot Studio, so here you only get what is specific to this agent.
The instructions say what always applies: The agent writes drafts and never makes the decision, and it only uses numbers from the notes, from the user's answers or from its sources. A number that appears nowhere must be marked with [ASSUMPTION]. A decision memo with an invented number is worse than no memo.
The recipe itself lives in a skill named write-decision-memo. The name can only contain lowercase letters, numbers and hyphens. The core of the skill is the six sections:
- Title: At most six words. Only letters, numbers and spaces.
- Summary: Two or three sentences on what the management team must decide, and what it costs.
- Background: Why the matter is relevant now, with a source for every number.
- Recommendation: One sentence that begins with "It is recommended that".
- Finances: All amounts added up, where the money comes from, and the calculation.
- Deadline: When the management team must decide, and why.
The rule about the title looks pedantic, but the title becomes part of the file name in step 3. A slash or a colon in the title makes SharePoint reject the file, and you only discover that kind of thing when something fails in front of your colleagues.
Step 3: Build the workflow that fills the template
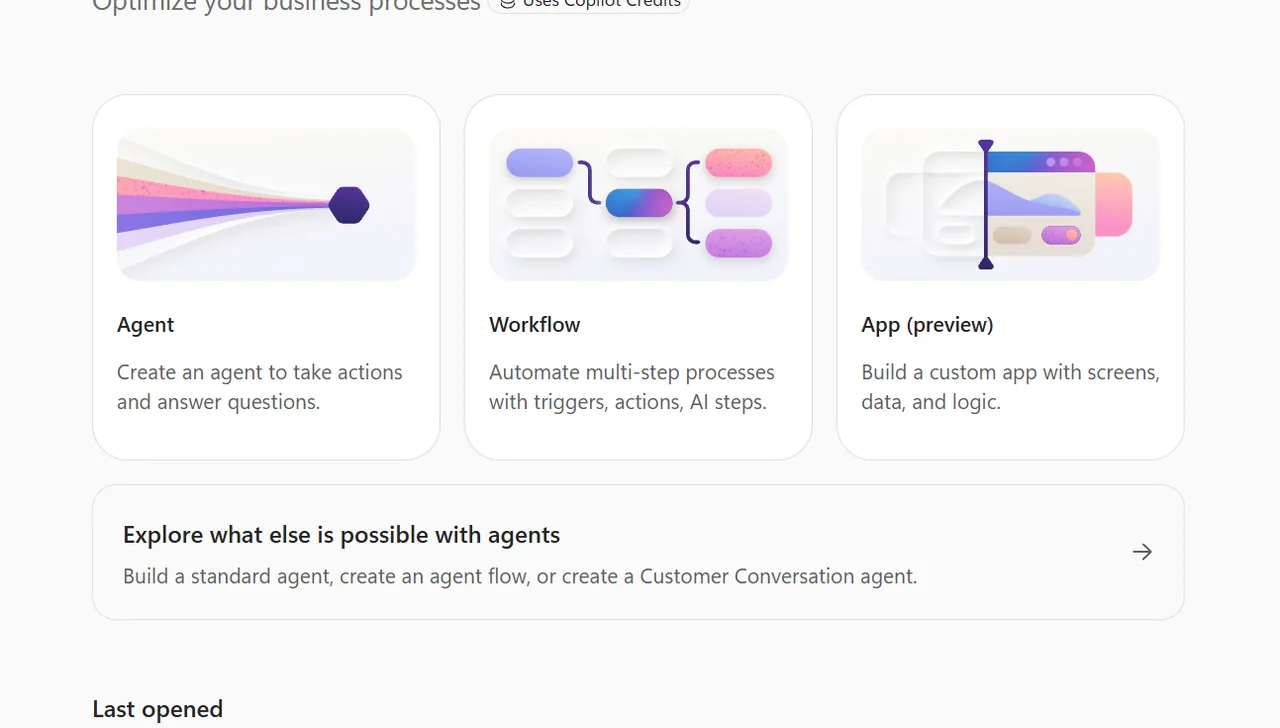
Open Workflows in the left menu, select New workflow, and name it Create decision memo in Word. The workflow has five steps.
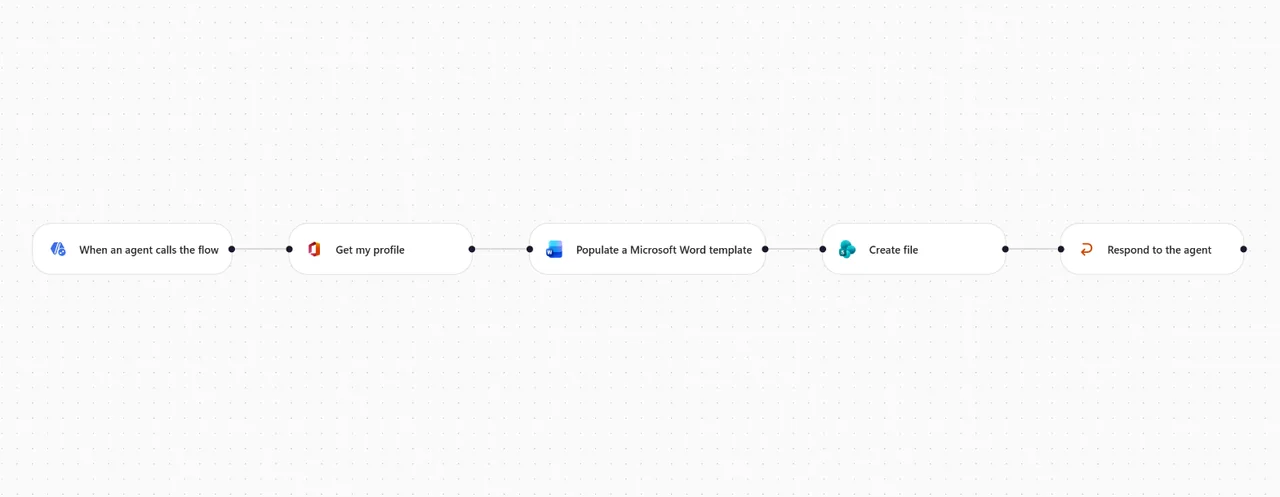
When an agent calls the flow
The trigger gets six text inputs with the same names as the sections in the skill: Title, Summary, Background, Recommendation, Finances and Deadline. Title must be the first one, because the file name further down reads exactly the first input.
Write a description on each input. The agent reads the descriptions when it fills in the fields, so "One sentence that begins with It is recommended that" does more good than the default text "Please enter your input".
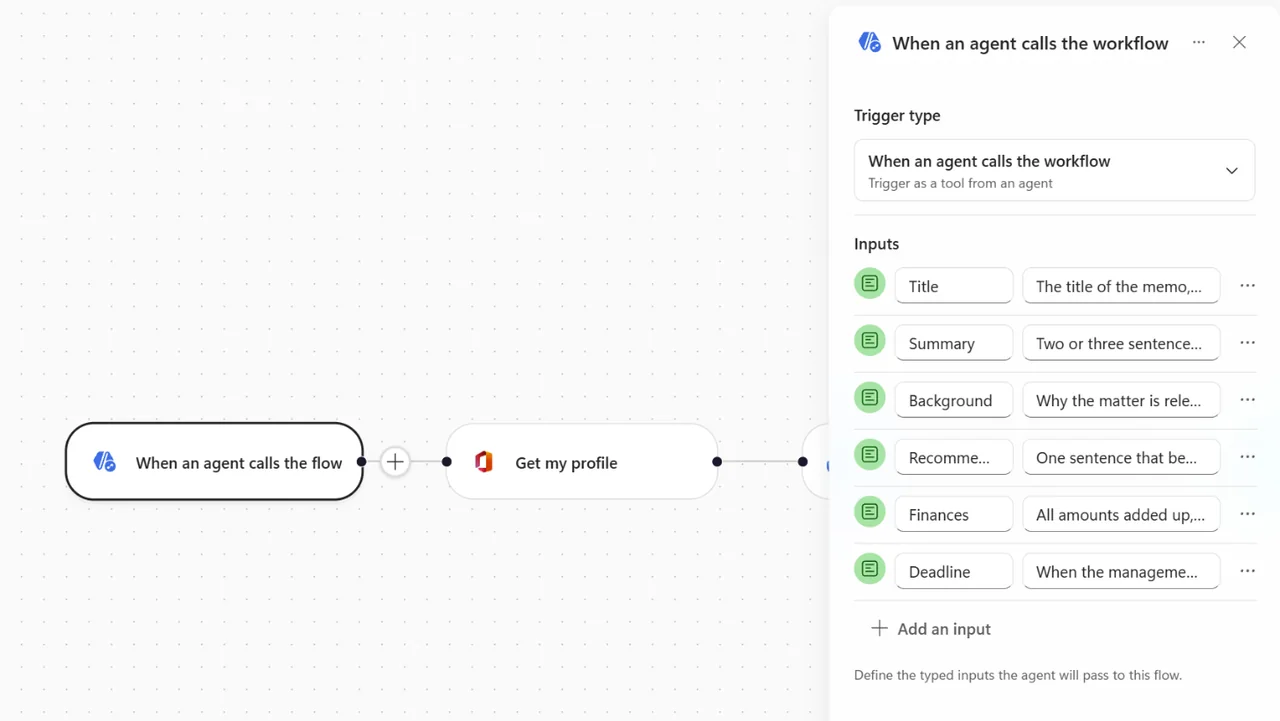
Get my profile
The action from Office 365 Users gets the name of the account the connection runs as. That name goes into the field Prepared by, so the agent does not have to guess who wrote the memo.
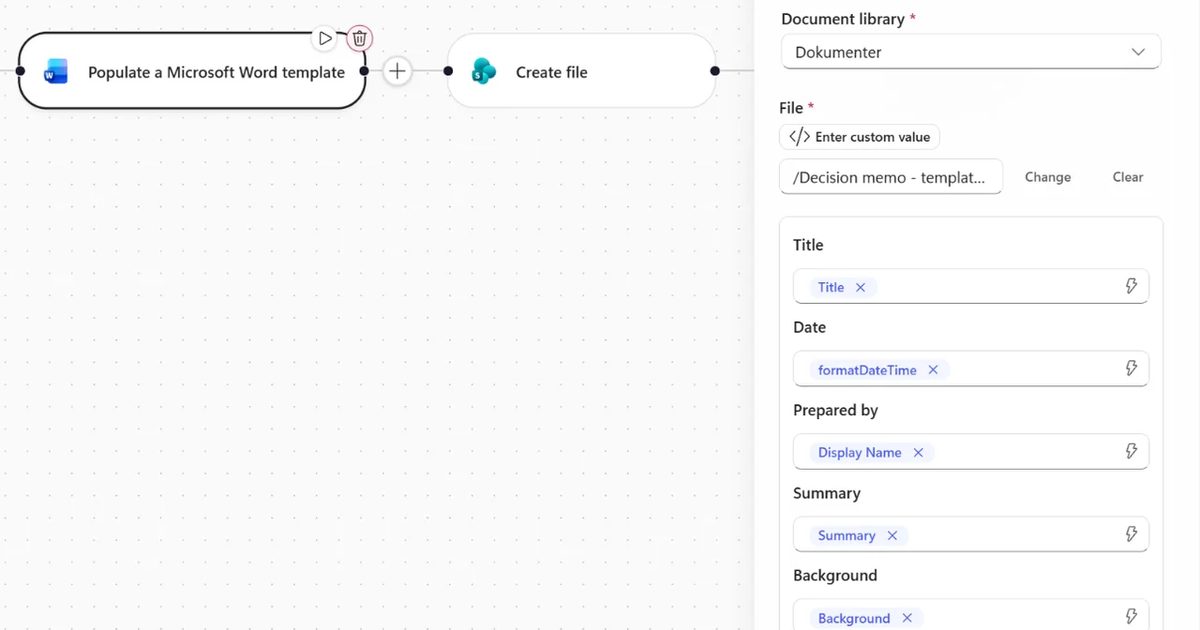
Populate a Microsoft Word template
Select the site, the document library and the template. Once the file is selected, each content control becomes a field in the action. Map the fields Title, Summary, Background, Recommendation, Finances and Deadline to the trigger input with the same name. Prepared by is mapped to Display Name from Get my profile, and Date gets an expression.
The expression for Date writes the date out in Danish time. Replace Romance Standard Time with your own time zone:
formatDateTime(convertFromUtc(utcNow(), 'Romance Standard Time'), 'd MMMM yyyy', 'en-GB')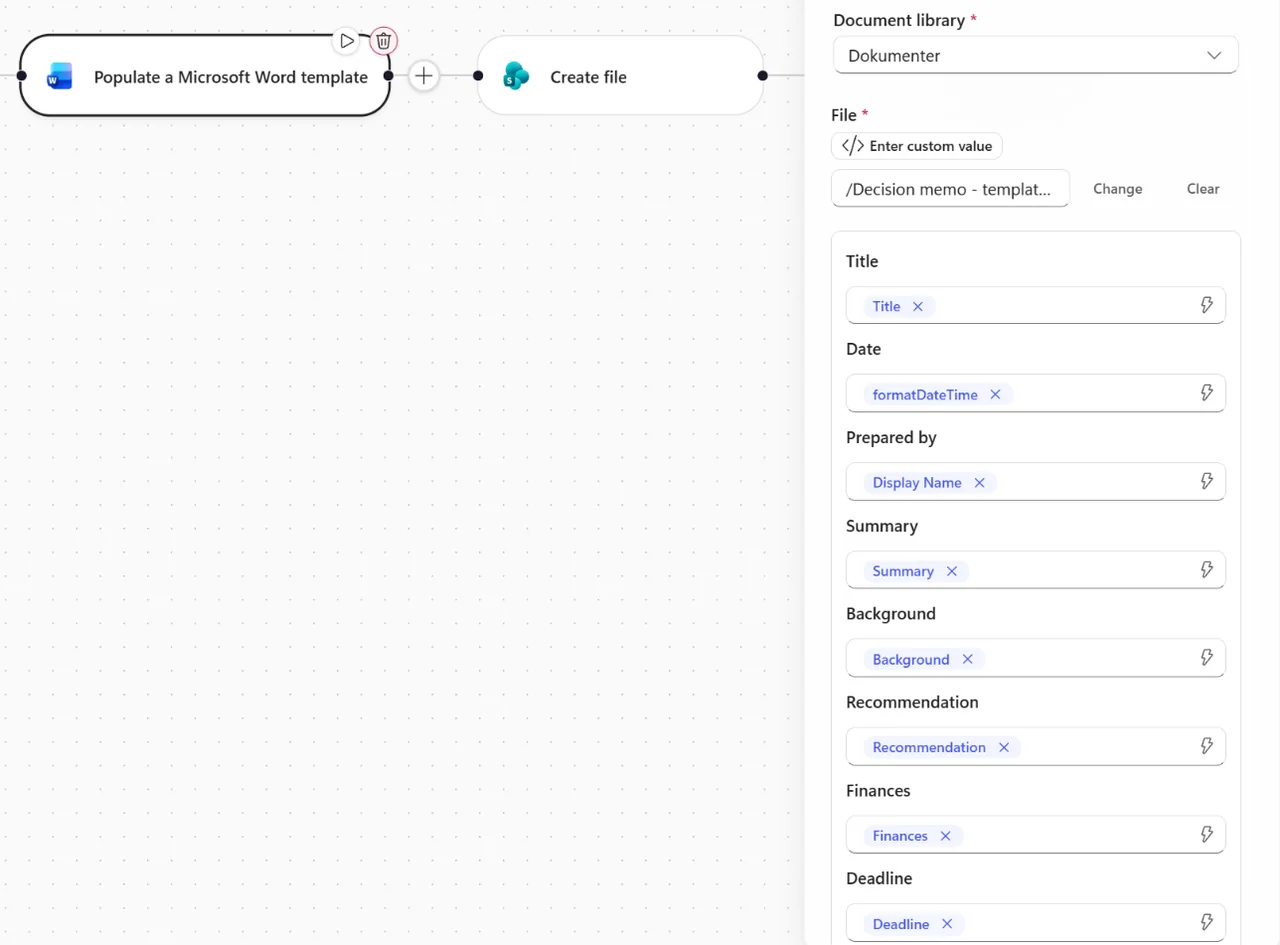
Create file
The SharePoint action saves the filled document. Select the site and the folder, and set File Content to Microsoft Word document from the previous step. The file name is an expression with the title, the date and the time:
concat('Decision memo - ', triggerOutputs()?['body/text'], ' - ', formatDateTime(convertFromUtc(utcNow(), 'Romance Standard Time'), 'yyyy-MM-dd HH.mm'), '.docx')The time is included so two runs with the same title get separate file names, as long as they are not in the same minute. If you run more often than that, add seconds to the format. Use the same time zone here as in the Date expression. The two expressions calculate the time separately, so a run across midnight can give one date in the document and another in the file name.
Respond to the agent
The last step sends a link back. Without it, the agent does not know whether the file was created. Add an output of the type Text with the name Link. The workflow only knows the file's path inside the site, so the expression puts the site address in front of the path from Create file and turns spaces into %20:
concat('https://YOUR-COMPANY.sharepoint.com/sites/Ledelse', replace(outputs('Create_file')?['body/Path'], ' ', '%20'), '?web=1')Replace YOUR-COMPANY and Ledelse with the address of your own site.
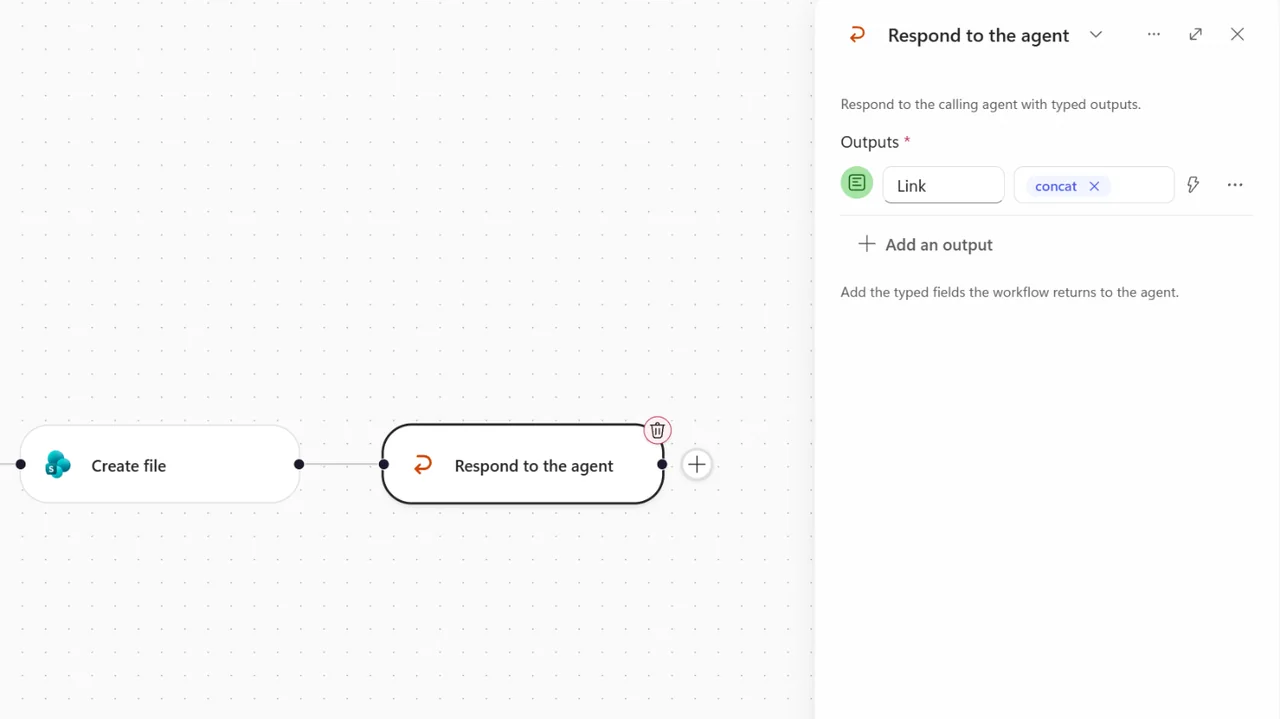
Click Save and then Publish. The agent calls the published version, so a saved change only takes effect once the workflow is published again.
Step 4: Give the agent the workflow, and test
- Open the agent, and click the plus under Tools in the right-hand panel.
- Select Workflows and then Create decision memo in Word.
- Open the skill, and add a final step that says when to call the workflow.
The step in the skill asks the agent to call the workflow when the draft is ready, if the user asked for Word. Otherwise the agent first asks whether the memo should be created in Word. It then fills the six inputs with the six sections as plain text and gives the user the link. The most important sentence is the last one: The agent must never write that the file has been created before the workflow has answered with the link.
Test in Preview with the notes and the numbers in one message. Above the answer the agent first shows "Used skill" and then "Used tool" with the name of the workflow, and finally the link to the Word file.
Work IQ: Let the agent find the numbers and prepare the email
Until now the user has fetched the numbers from last year's evaluation and from the budget. Work IQ changes that by giving the agent access to the user's work in Microsoft 365. Work IQ became generally available in Copilot Studio in November 2026, and according to Microsoft it is added by default on new agents with the Microsoft Copilot harness.
The default is broad: SharePoint, OneDrive, Outlook mail, Teams, Calendar and People, all with write access.
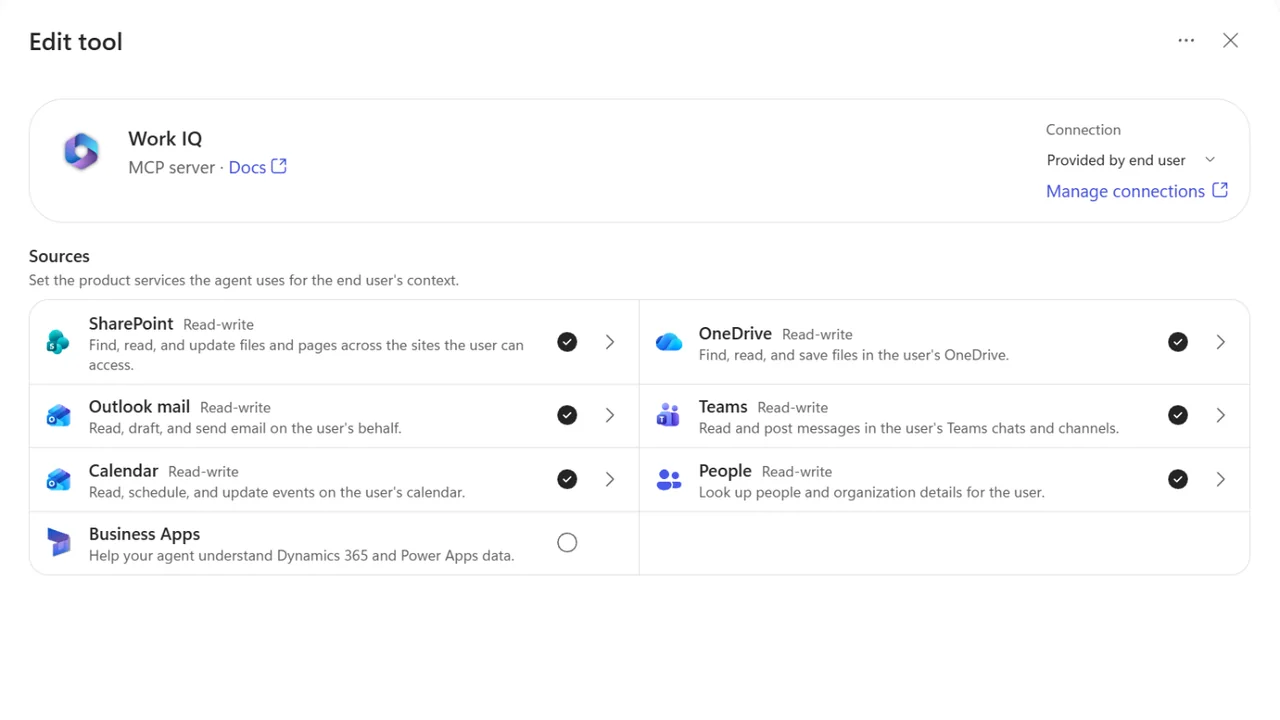
Cut it down to what the task requires:
- Click Work IQ under Tools to open the Edit tool panel.
- Clear the selection next to OneDrive, Teams and Calendar.
- Click the arrow next to SharePoint, and set Access level to Read-only. Do the same for People.
- Leave Outlook mail on Read-write. Otherwise the agent cannot create a draft.
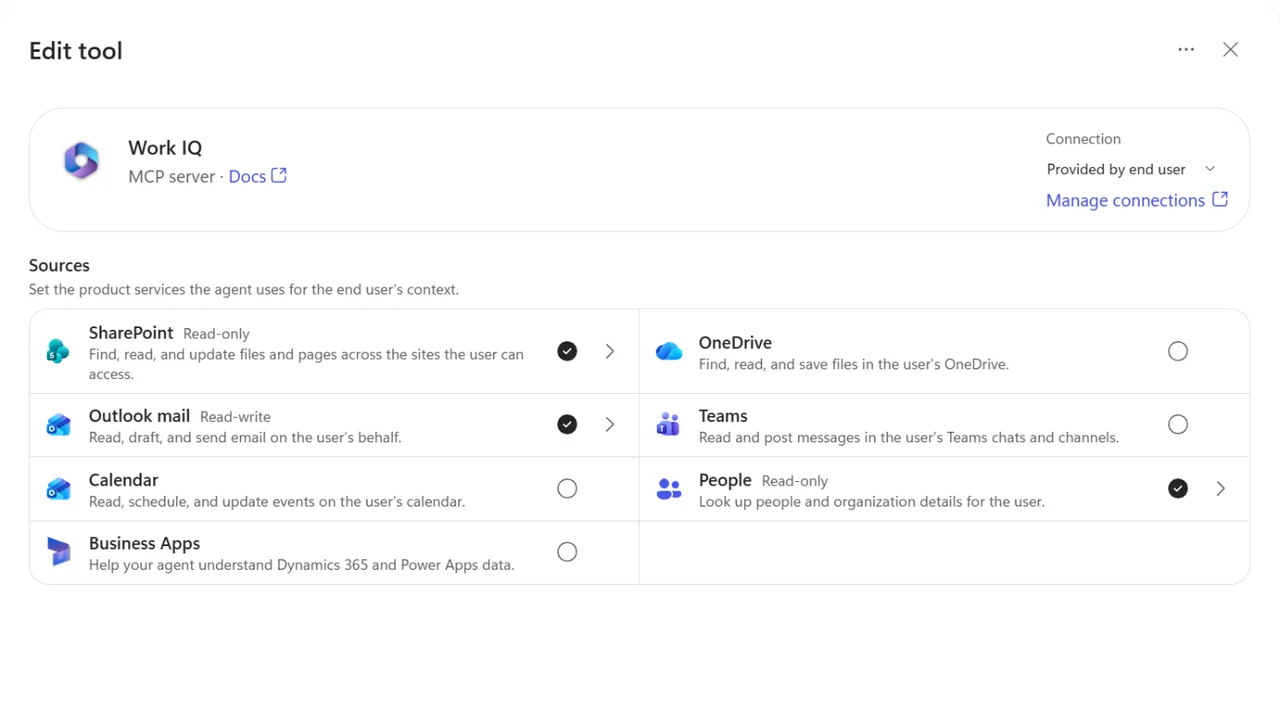
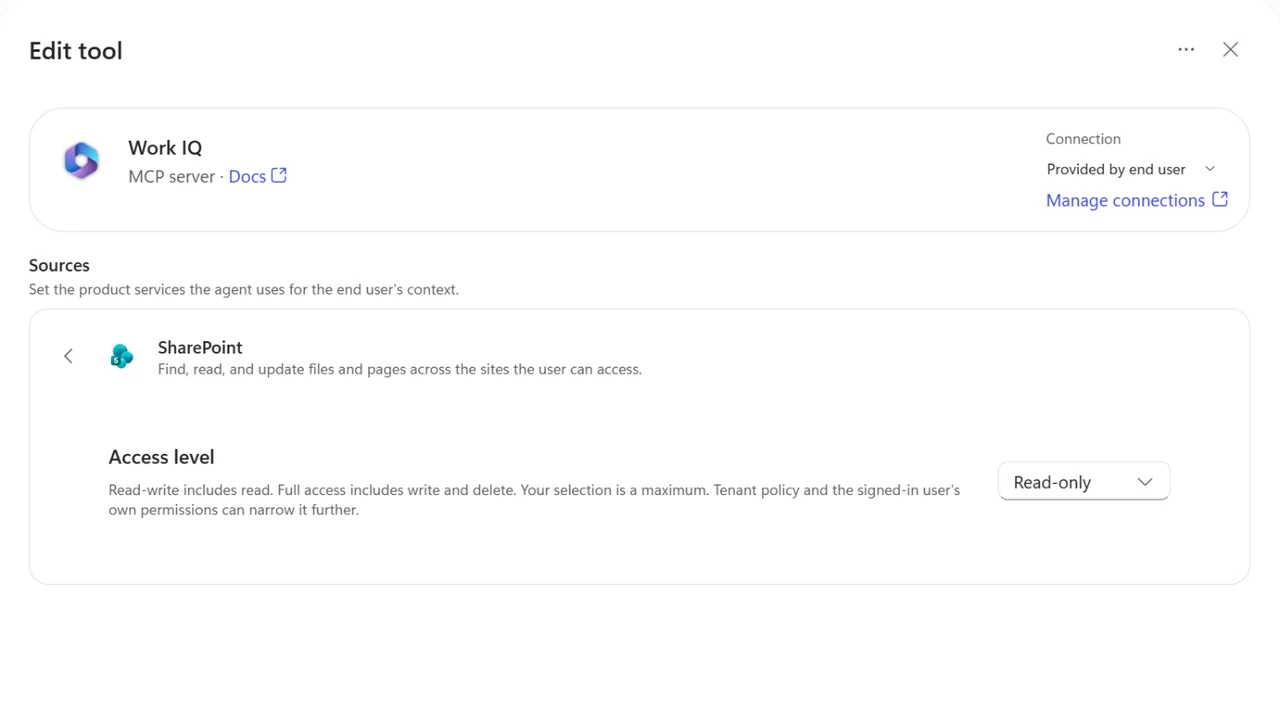
The access level is a ceiling. Tenant policy and the user's own permissions can only narrow it further.
Then the instructions get a section on Work IQ: Find the background on the Ledelse site before asking the user for numbers. Use the newest evaluation, and write which document each number comes from. Find the user's manager via People. Create an email draft to the manager with the link, and never send an email.
Now the four lines of notes are enough. The agent finds the evaluation and the budget, writes the memo, calls the workflow and puts the draft in Outlook. In my setup a run with everything took about four minutes and cost 176 Copilot Credits, against 27 when the numbers were in the prompt. Put the waiting time in the agent's greeting before colleagues think it has stalled.
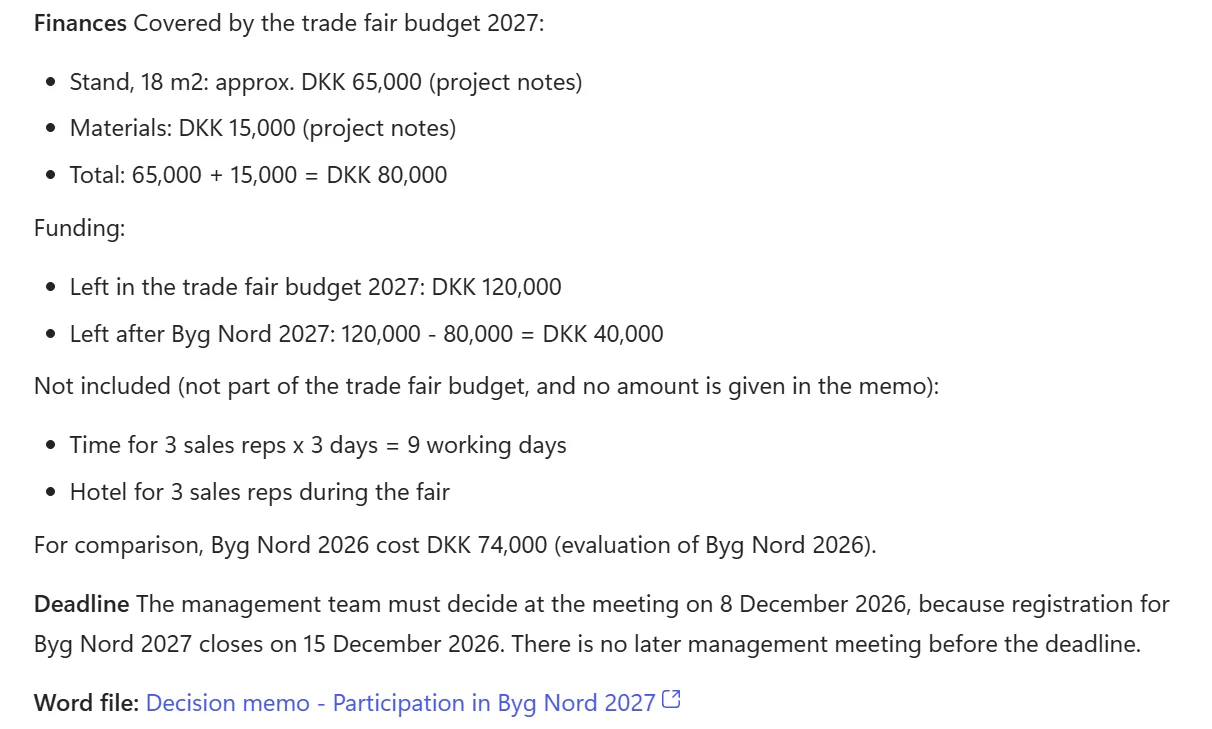
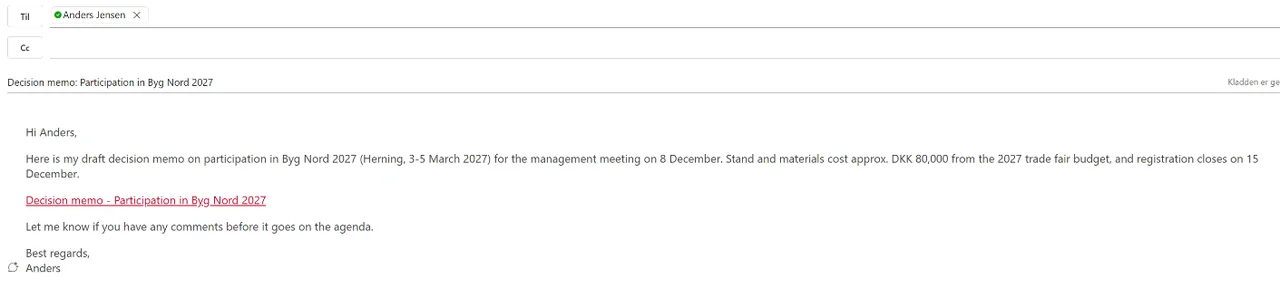
Work IQ runs with the user's own permissions, so the agent never sees more than the user has access to. But "never send an email" in an instruction is behavior, not a security boundary. The boundary is the access level on each source, and Outlook mail has to be on Read-write to create the draft. So test with your own mailbox first.
Workflow or Work IQ: When do you use which?
The two tools sit in the same agent, but they work in opposite ways.
- You plan the workflow. Fixed steps, field by field. Use it when the result must be the same every time: The template, the file name and the location.
- The agent plans Work IQ itself. You describe the goal, and the agent finds the documents, the manager and the way there. Use it when the route differs from time to time.
The agent can create a Word file without the workflow: According to Microsoft, the harness can create Word files on its own, and Microsoft writes that Work IQ will also get support for Word, Excel and PowerPoint. But then the agent decides the layout. I keep the workflow for everything that has to look the same every time.
Common mistakes
- The fields are text and not content controls. The action shows no fields when the template only has {{placeholders}}. The same goes for controls of the types Rich Text, Date Picker and Check Box.
- The workflow is saved but not published. The agent calls the published version and therefore runs the old one.
- Characters in the title that SharePoint does not allow in file names. Solve it in the skill, not in the workflow.
- The agent says the file has been created when it has not. The skill must require the link from the workflow first.
- The workflow answers too late. The agent waits at most 100 seconds for the response, so put approvals and other long steps in a separate workflow.
- Work IQ has all sources and write access. That is the default on a new agent, and it must be cut down before the agent is shared.
My recommendation
Let the agent write, and let the workflow handle everything that must not vary. The agent is welcome to phrase things differently from time to time, but the template, the file name and the location must stay the same. So build the workflow first, test it on its own, and only then give it to the agent.
Work IQ is what turns the agent into a colleague and not a typewriter, but start with few sources and read access. Two things are not in Microsoft's documentation at the time of writing: Whether the agent asks for confirmation before it sends an email, and which license users need for Work IQ. Settle both before the agent is rolled out to anyone but yourself. When the agent and the workflow move to production, they travel in a solution, as described in the guide to Power Platform ALM. On our Copilot Studio course, participants build the same type of agent with their own templates.
Frequently asked questions
Do users need a Microsoft 365 Copilot license to use the agent?
At the time of writing, Microsoft Learn states no per-user license requirement. On the Microsoft Copilot harness, usage is paid with Copilot Credits bought by the organization, both while you build and when colleagues use the agent.
Does Populate a Microsoft Word template require a Power Automate Premium license?
Not when the action sits in a workflow in Copilot Studio. Word Online (Business) is a premium connector, but in Copilot Studio the run is paid with Copilot Credits. If you build the same thing as a regular cloud flow in Power Automate, it requires Power Automate Premium.
Why does the workflow not fill the fields in my template?
Because the fields are not content controls. Populate a Microsoft Word template only finds content controls with a title, not text like {{Title}}. Create the fields on the Developer tab in Word, give each one a title, and save the file as .docx on SharePoint or OneDrive.
Can the agent create a Word file without a workflow?
Yes. According to Microsoft, the Microsoft Copilot harness can create Word files on its own. The agent then decides the layout from run to run. Use the workflow when the text must go into your own template, with the same fields, file name and location every time.
Can the agent always use a specific font?
In the document, the template controls the font. Put the font, colors and logo in the Word template. Populate a Microsoft Word template keeps the template's formatting, so every document looks the same. In the chat you cannot fix a font.
Microsoft's own documentation is under Word Online (Business) and Work IQ in Copilot Studio. I post new Copilot Studio guides and what changes in the product on LinkedIn.