Power Platform ALM is how you stop building and fixing flows in the same place your colleagues use them. Edit a live flow, and every mistake hits the business. This guide takes one flow from dev to test to production with solutions, connection references, environment variables and Pipelines, including flows that live in the default environment today.
The example is an ordinary internal process: Employees sign up for internal courses in a SharePoint list, and the flow posts a Teams message to the person who handles the sign-ups. It is deliberately small, and the same steps apply to a flow with fifty actions.
Moving a flow from dev to production is one of the questions I hear most often. The answer is a handful of habits that only work together.
Why flows need to leave the default environment
Everyone in your tenant shares the default environment, and every licensed user is a maker there. Microsoft writes that it "shouldn't be used for production workloads". The Default Solution cannot be exported either, so an existing flow must first go into a solution of its own.
Without a test environment, you fix things where your colleagues work, and a flow with one owner is at risk when that person leaves.
ALM (application lifecycle management) is the set of fixed rules for where you build, where you test and where the flow runs for real.
Overview: How it fits together
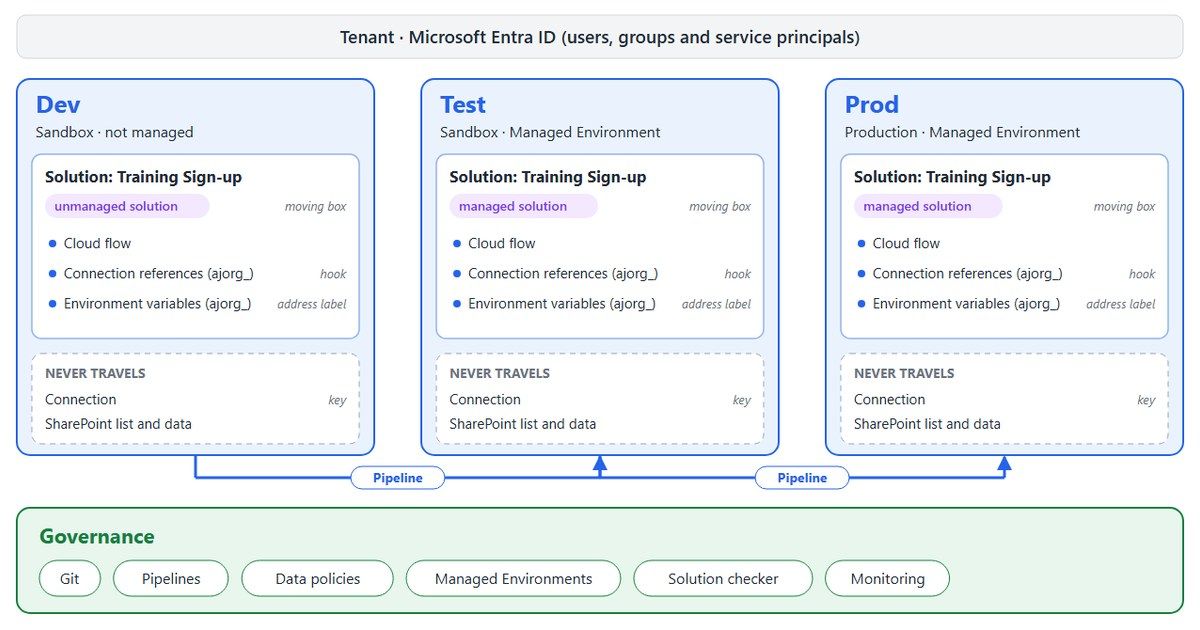
The diagram shows the end result: Three environments, the same solution in each, and the things that never travel with it.
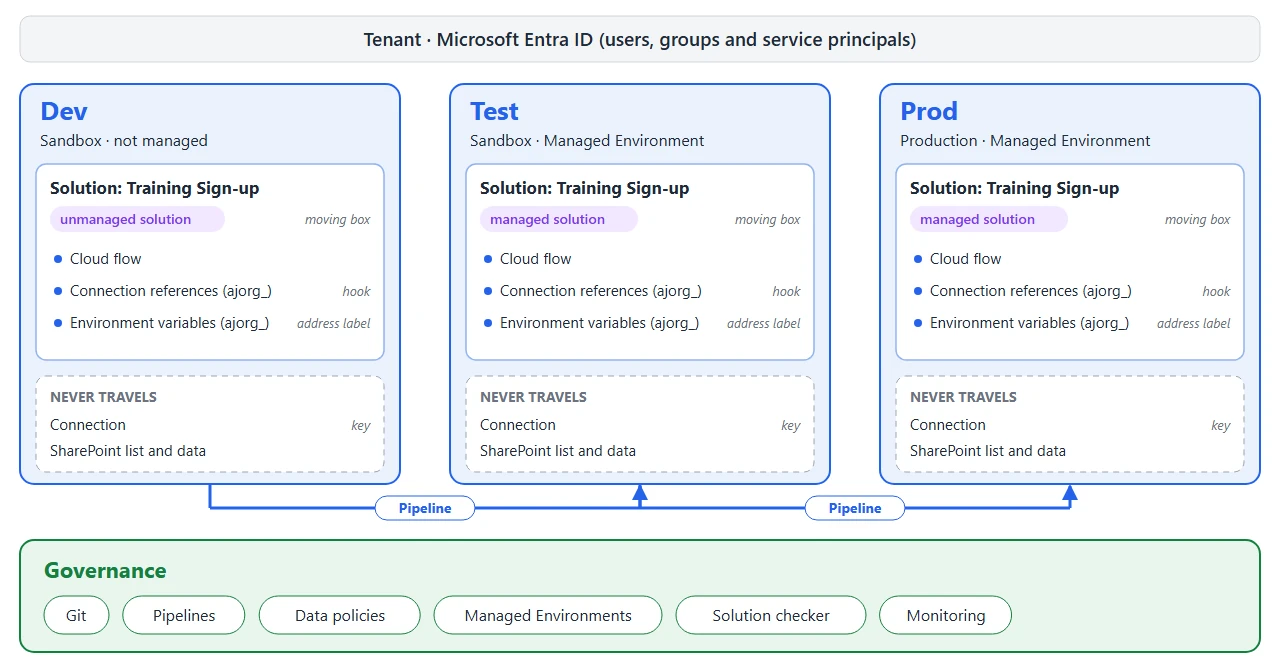
The terms, with an analogy where one helps:
| Term | What it is | Think of it as |
|---|---|---|
| Tenant | Your organisation's Microsoft 365 and Entra ID | |
| Environment | A container for flows, apps and data, such as Dev, Test or Production | |
| Dataverse | The database behind an environment, where solutions live | |
| Solution | The package that holds your flow and what it needs | A moving box |
| Publisher | Who made the solution. Sets the prefix on technical names | The sender's stamp on the box |
| Connector | The integration to a service, such as SharePoint or Teams | |
| Connection | A saved sign-in to a connector | A key |
| Connection reference | The placeholder in the solution that points to a connection | The hook the key hangs on |
| Environment variable | A value that differs per environment | An address label |
| Unmanaged and managed | The editable version in dev, and the locked version everywhere else | An open box and a sealed box |
| Pipeline | Moves a solution between environments | A conveyor belt |
| Service principal | An application identity that can own flows instead of a person |
One thing is easy to miss: A solution moves the recipe for the flow. Connections, Dataverse data, SharePoint sites and lists must already exist in each environment.
Environments: Dev, test and production
Which environments you need
You need at least separate environments for development and production, and Microsoft recommends at least one test environment too. Every environment that takes part in ALM must have a Dataverse database.
Environment types: When to use which
You choose the type under "Type" when you create the environment.
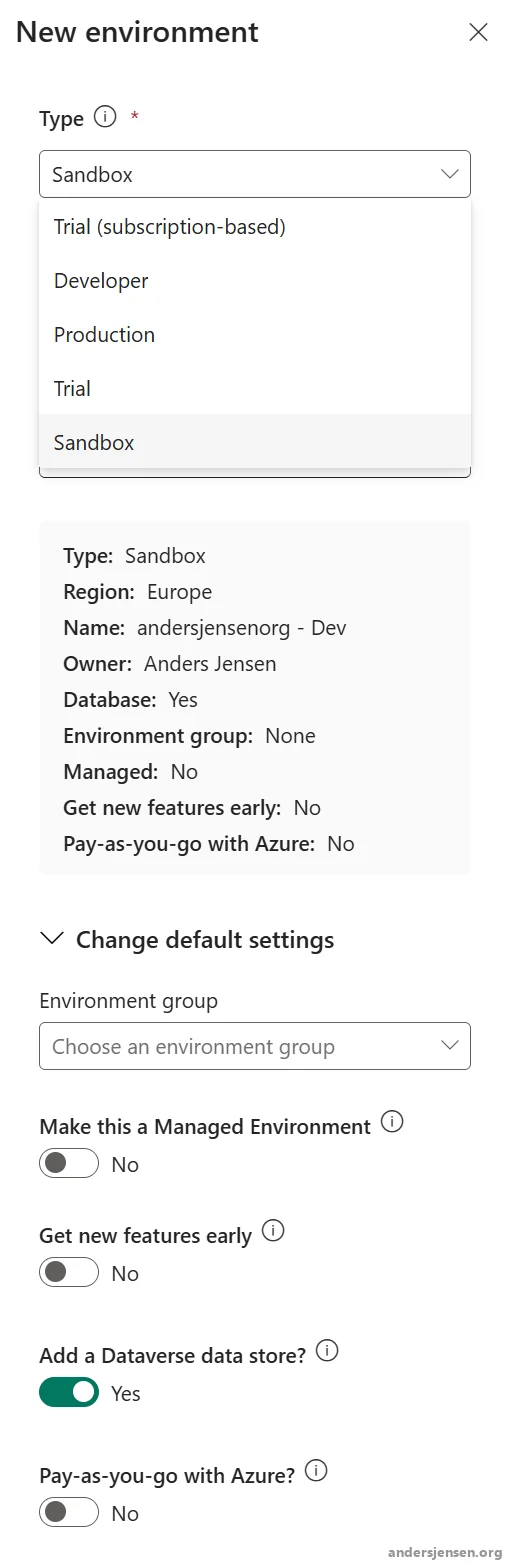
| Type | What it is | Who uses it | Dev, test or production |
|---|---|---|---|
| Developer | Personal. Microsoft calls it "intended only for use by the owner". Security groups cannot be assigned | One developer trying things out | Personal dev, not shared dev |
| Sandbox | Non-production. Can be copied and reset, and a reset deletes everything for good | The team that builds and tests | Shared dev and test |
| Production | For permanent work in the organisation | The users of finished flows and apps | Production. Microsoft also recommends it as the Pipelines host |
| Default | One per tenant, for experiments and light apps and flows. Cannot be deleted | Everyone in the tenant | Neither |
| Trial | Expires after 30 days, with one 30-day extension. One per user. Cannot be reset, backed up or copied | Someone trying Power Platform | Neither. Can be converted to Production |
Production and Sandbox need at least 1 GB of free database capacity to be created. The list also offers "Trial (subscription-based)", which according to Microsoft only tenant-level admins can create. Microsoft Dataverse for Teams environments can still appear in the list, but Microsoft is retiring them.
Change an environment's type later
Three changes are possible:
- Production to Sandbox: "Manage" › "Environments" › select the environment › "Edit" › "Type" › "Sandbox" › "Save".
- Trial to Production: "Manage" › "Environments" › select the trial environment › "Convert to production". Requires 1 GB of free capacity.
- Sandbox to Production: "Manage" › "Environments" › "…" next to the Sandbox environment › "Convert to production".
Developer environments are personal
Microsoft is phasing out unmanaged developer environments. No new ones can be created from November 15, 2026, existing ones are suspended from December 15, 2026, and deletion starts on January 15, 2027. Managed developer environments remain, one per user, and running anything in them requires a premium licence.
Create an environment
- Open the Power Platform admin center, and go to "Manage" › "Environments" › "New".
- Enter a name such as "andersjensenorg - Dev", and choose "Sandbox" and your region.
- Open "Change default settings", and set "Add a Dataverse data store?" to "Yes". It is set to "No" by default.
- Click "Next", and finish the Dataverse settings.
- Repeat for Test (Sandbox) and Production (Production) in the same region, so Pipelines can see them without extra settings.
The list after Test and Production became Managed Environments:

Permissions in dev
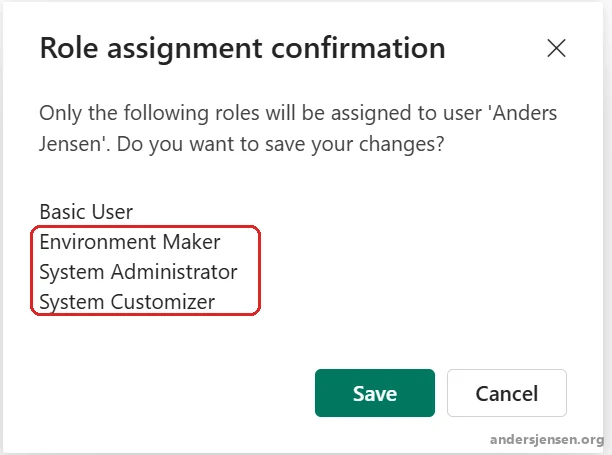
Give developers the roles Environment Maker and System Customizer in dev. Microsoft's overview of the built-in roles lists Environment Maker for cloud flows outside solutions, and System Customizer for cloud flows, desktop flows and tables. To assign them:
- In the Power Platform admin center, select the dev environment, and go to "Settings" › "Users + permissions" › "Users".
- Select the user, and choose "Manage security roles".
- Select "Environment Maker" and "System Customizer", and save.
Publisher and solution
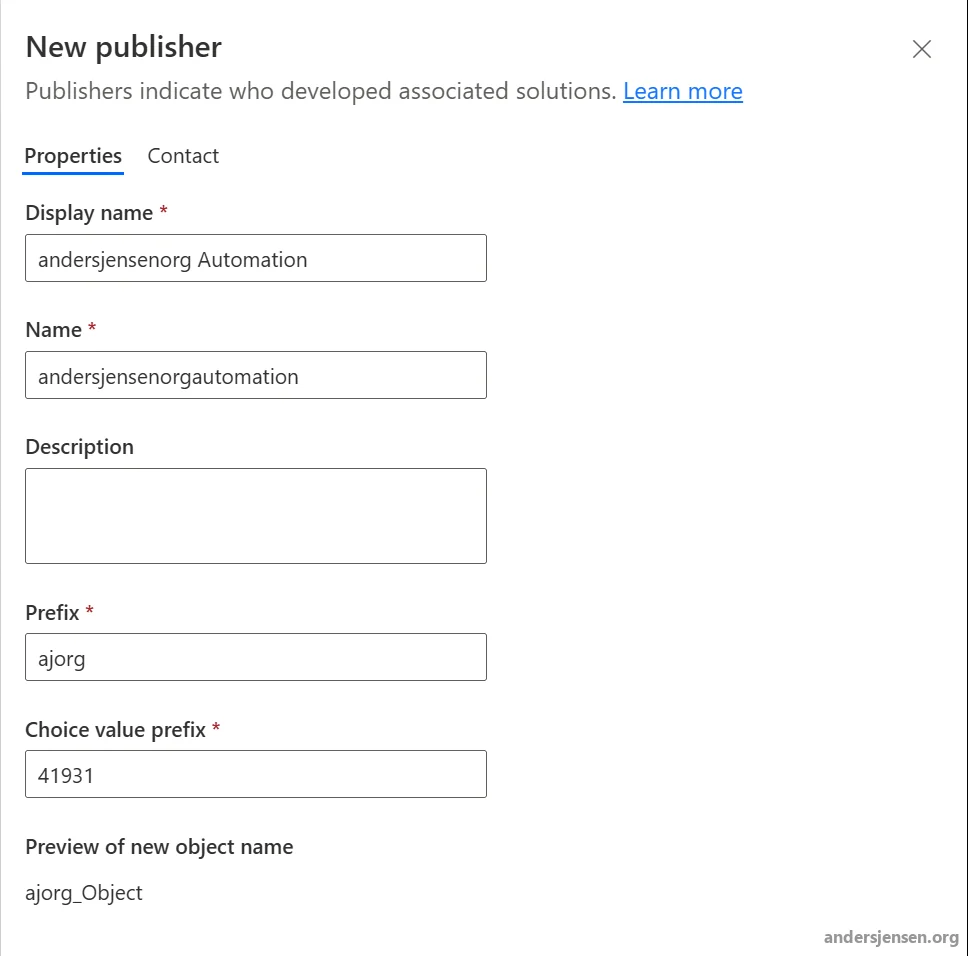
The publisher's prefix goes in front of the technical name (the Name field) of components such as connection references and environment variables, for example ajorg_. You can choose the display name. Choose the prefix before you create anything, because technical names cannot be changed afterwards.
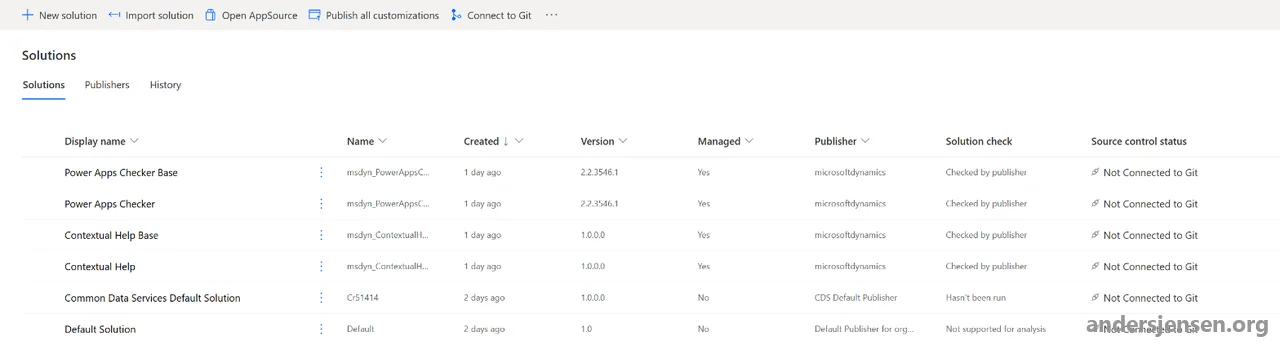
Do not use the default publisher, which has a random prefix such as cr8a3. Create one publisher for the whole team or organisation. In the example it is "andersjensenorg Automation" with the prefix ajorg. A new environment only holds the built-in solutions:
- In Power Automate, pick the dev environment in the environment picker. Everything is built there from now on.
- Go to "Solutions" › "New solution".
- Under "Publisher", click "New publisher", enter "Display name", "Name" and "Prefix", and save.
- Back in the "New solution" panel, enter the "Display name" "Training Sign-up" and a "Name", select your publisher, and keep "Version" 1.0.0.0.
- Click "Create".
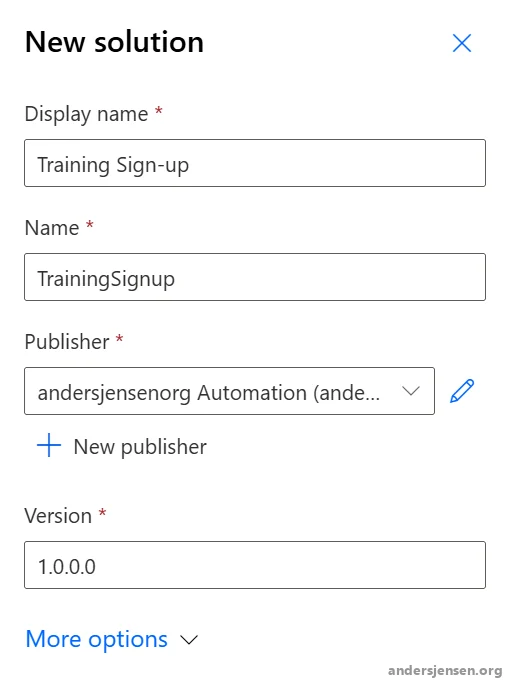
Set the solution as your preferred solution, so new objects land in it. The command is in Power Apps, not in Power Automate's "Solutions" list:
- Go to make.powerapps.com, pick the dev environment, and open "Solutions".
- Choose "Set preferred solution" in the command bar.
- Select "Training Sign-up", and click "Apply".
An admin can also turn on the environment setting "Create new canvas apps and cloud flows in Dataverse solutions" under "Settings" › "Product" › "Features", so new flows are always solution flows. Check the setting in each environment. At the time of writing, Microsoft's documentation labels it as preview.
One solution or several
Start with one solution per thing you deploy together. Microsoft calls a single solution the simplest strategy, and several unmanaged solutions in the same dev environment make it easier to create dependencies that lock each other.
If you split up later, import the solution the others depend on first, because an import fails when a registered required component is missing. The import does not catch every dependency: Microsoft mentions a flow that uses a column from another solution, where the import succeeds but the flow fails. So test the flow after every import.
Connections and connection references
The key and the hook
A connection is a saved sign-in to a connector, and it belongs to the person who created it. It is never part of a solution. A connection reference is the hook inside the solution. When you import, you choose which connection the hook uses in the new environment.
Create the connections first:
- In Power Automate in dev, go to "Connections", and create a SharePoint connection and a Microsoft Teams connection.
- Do the same in test and production.
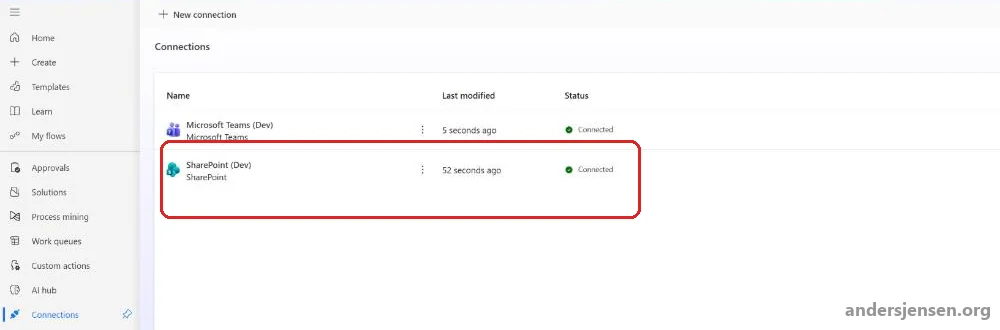
Make the hooks yourself
Create one connection reference per connector before you build the flow, here SharePoint and Teams. Otherwise Power Automate creates them for you, named after the connector and the solution with a random suffix. One hook per connector is my recommendation. Microsoft only writes that Power Automate tries to reuse existing connection references.
- Open the solution, and choose "New" › "More" › "Connection reference".
- Enter a "Display name", for example "andersjensenorg SharePoint". The "Name" gets your prefix automatically.
- Choose the "Connector" and the "Connection", and click "Create".
- Repeat for Microsoft Teams.
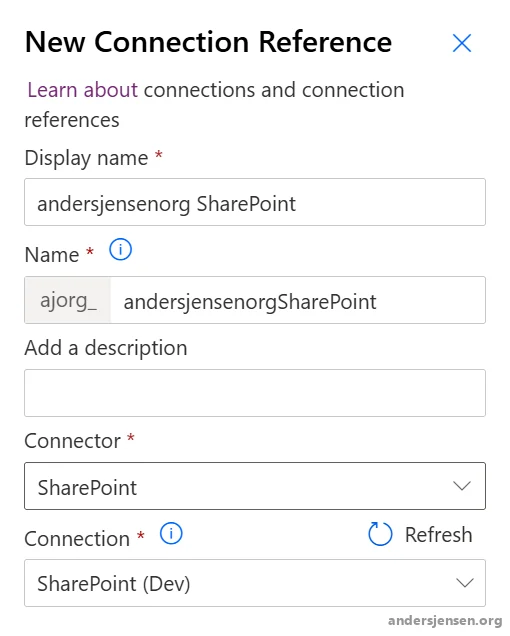

This is an automatic one, created when an existing flow is added to a solution:

Who can turn the flow on
The person who turns the flow on must own or have access to all its connections. After that, co-owners can turn it off and on. So let the account that owns the connections turn the flow on the first time.
SharePoint and Teams use OAuth connections, and according to Microsoft you can only share those explicitly with a service principal ("Can use"), not with a colleague. Co-owners can use the services in the flow, but cannot change the sign-in on a connection another owner created. The ownership of a connection reference cannot be changed from the Solutions area.
Environment variables
Environment variables take everything environment-specific out of the flow. Values can be at most 2,000 characters.
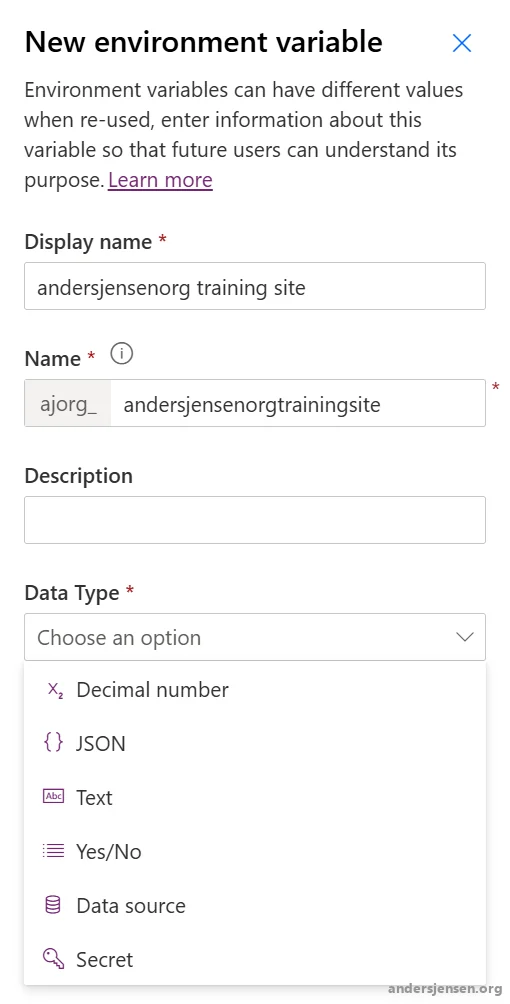
| Type | Use it for |
|---|---|
| Decimal number | A number |
| Text | Text, such as an email address |
| JSON | Structured settings in one value |
| Yes/No | An on/off switch. Microsoft's documentation calls it Two options |
| Data source | A SharePoint site or list |
| Secret | A value in Azure Key Vault, described below |
Prepare the SharePoint lists
Each environment needs its own SharePoint site with the list. Microsoft writes that internal column names are not necessarily the same just because two lists have the same name and columns, and that metadata always matches when the whole site is copied (environment variables, data source variables). Set up the lists like this:
- In the dev site, create the list "Training sign-ups" with Title, Department (Choice), Course (Choice) and a Date column named
PreferredDatein one word. - Rename that column to "Preferred date". The internal name stays
PreferredDate. - On the home page of the test site, choose "+ New" › "List".
- In the "How would you like to start?" dialog, choose "Existing list" under "Import from".
- Under "Select a Team or site", pick the dev site, select "Training sign-ups", and click "Next".
- Enter the name "Training sign-ups", and click "Create". The new list is empty and has the same columns, views, formatting and Choice values as the dev list.
- Repeat on the production site.
- In all three lists, open each column under "List settings", and check that
Field=in the address isTitle,Department,CourseandPreferredDate. - If a name differs, delete the list, and create it again from the dev list.
Create the variables
- Open the solution, and choose "New" › "More" › "Environment variable".
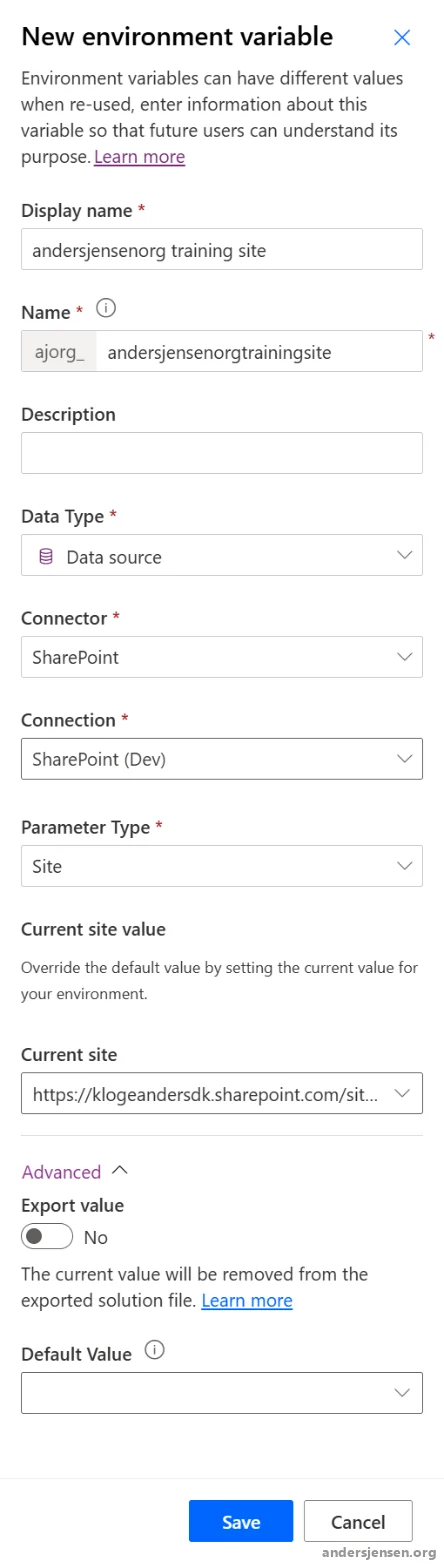
- Create "andersjensenorg training site": "Data source", the SharePoint connector, your connection, "Parameter Type" "Site", and the dev site as current value.
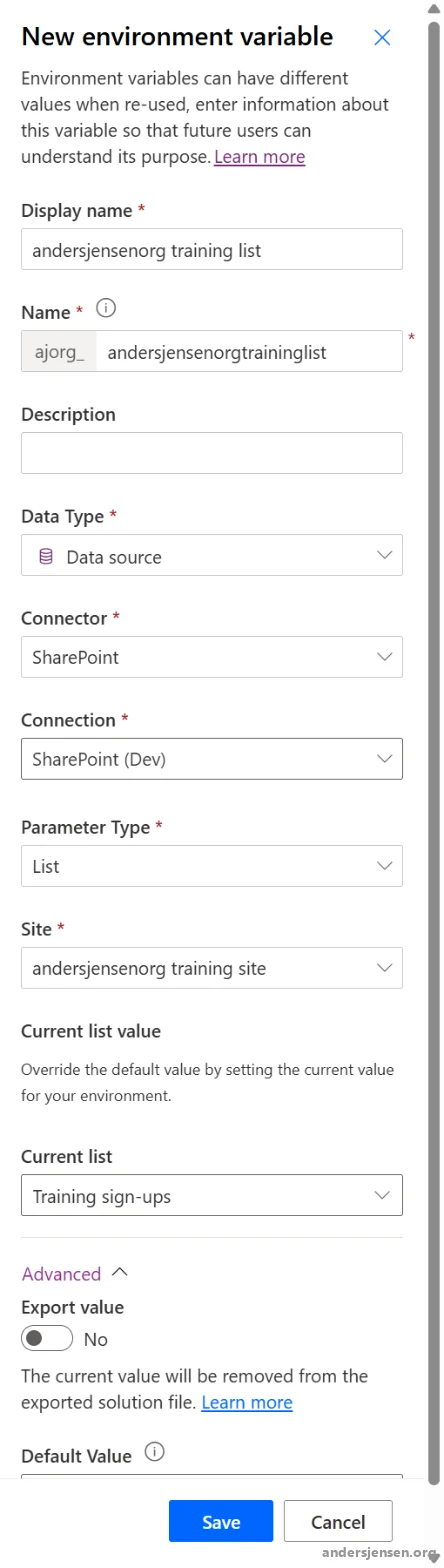
- Create "andersjensenorg training list" the same way with "Parameter Type" "List", select the site variable under "Site", and pick "Training sign-ups".
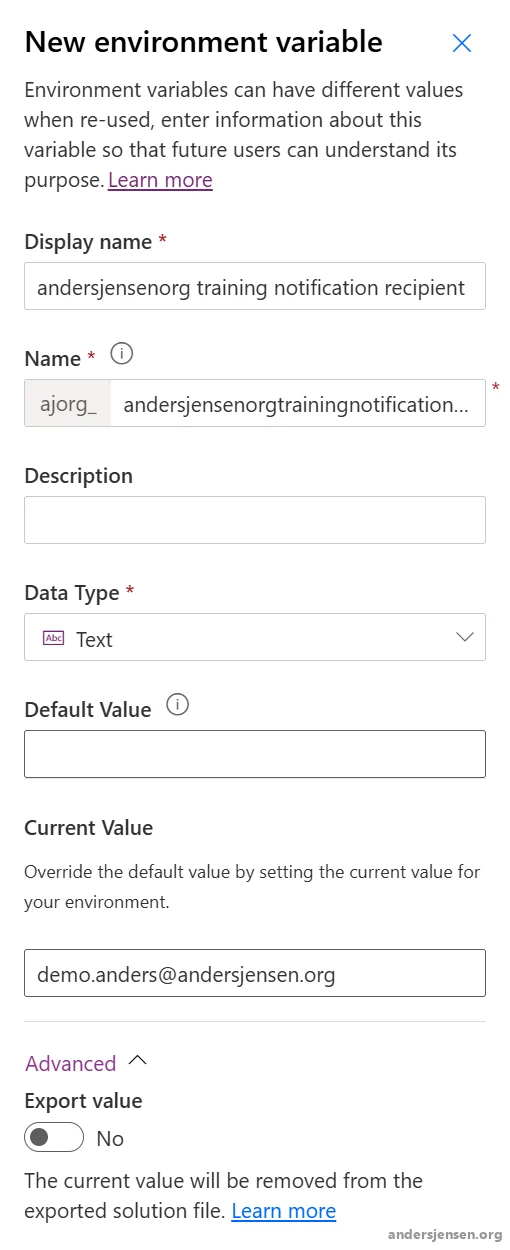
- Create "andersjensenorg training notification recipient" as "Text", with the recipient's email address as current value.
Keep dev values out of test
The current value wins over the default value. If the dev value travels with the solution, the flow in test points to the dev list. Microsoft's guidance is to remove the current value from the solution before you export.
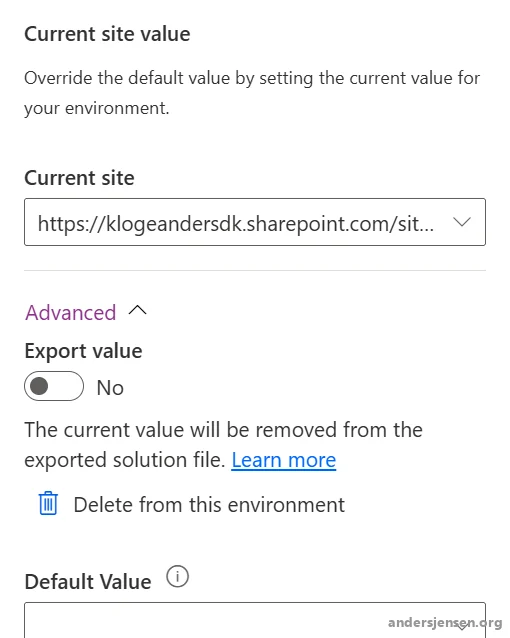
The panel also has an "Export value" toggle, which says the current value will be removed from the exported file. Do not rely on "Export value" alone: Values recreated via the Default Solution get "Yes", and the list variable's panel does not save "No" while its "Site" field is empty. So do this:
- Before you export, choose "Current Value" › "…" › "Remove from this solution" on each variable.
- After the export, open the zip file.
- Look for files named environmentvariablevalues.json. If they are there, the dev values travel with the solution.
If you change a value directly in an environment, the flow keeps the old value until it is saved or turned off and on, which can take up to an hour.
Secret variables
A Secret variable gets its value from Azure Key Vault, the only supported store. It requires the resource provider Microsoft.PowerPlatform, the role Key Vault Secrets User and a key vault in the same tenant. Secrets are not in dynamic content: The flow reads the value with a Dataverse action (setup guide).
Build the flow in the solution
Before you start: The Teams action needs the Workflows app (formerly Power Automate) to be available and allowed in the Teams admin center. If it is blocked, the action fails even though the connection exists.
- Open the solution, and choose "New" › "Automation" › "Cloud flow" › "Automated".
- Pick the SharePoint trigger "When an item is created", and click "Create". The classic designer opens, with only "Save". Environment variables appear in dynamic content only after the flow is saved.
- Fill in temporary values: The dev site's address in "Site Address", the list in "List Name", and the Teams action "Post message in a chat or channel" with Post as "Flow bot", Post in "Chat with Flow bot", your own address as recipient and temporary text in "Message". Click "Save".
- The classic designer has no switch to the new one. Open the flow's address with
?v3=trueat the end. - In "Site Address" and "List Name", choose "Enter custom value", type /, choose "Insert dynamic content", and insert the two environment variables. They are under "Parameters".
- Recipient is a people picker. Click the gear icon next to it, choose "Use dynamic content", and swap your address for the recipient variable.
- Replace the temporary text in "Message" with "Title" (the name), "Course" and "Preferred date" from the trigger.
- Click "Save draft", and then "Publish".
- Create a test item in the dev list.
- Check that the run shows as "Succeeded" and that the message has arrived in Teams.
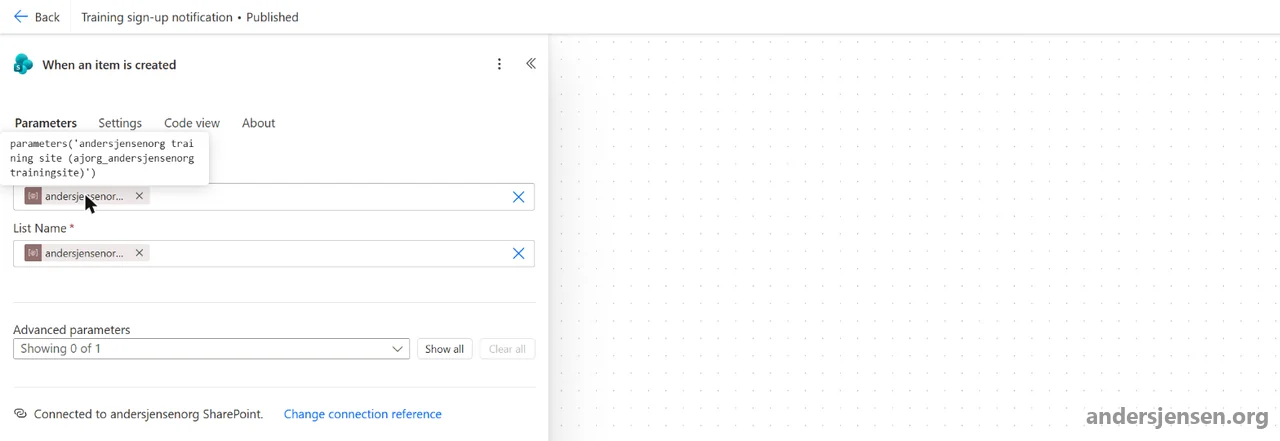
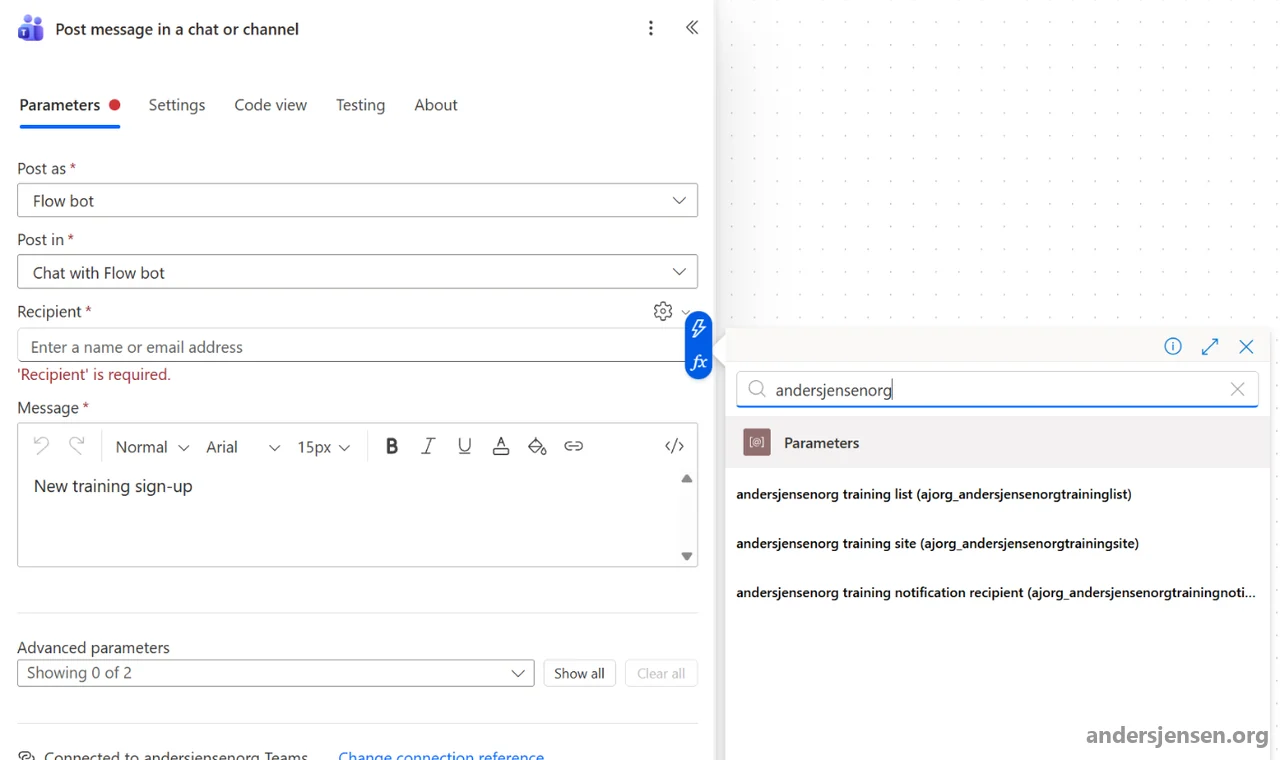
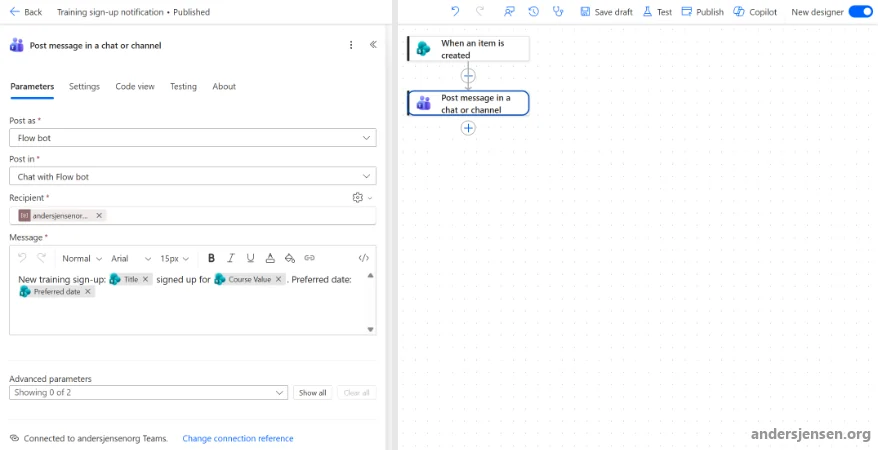
A draft does not run until it is published, and an export only includes published components. Solution flows also get a version history, where you can restore an earlier version as a draft.
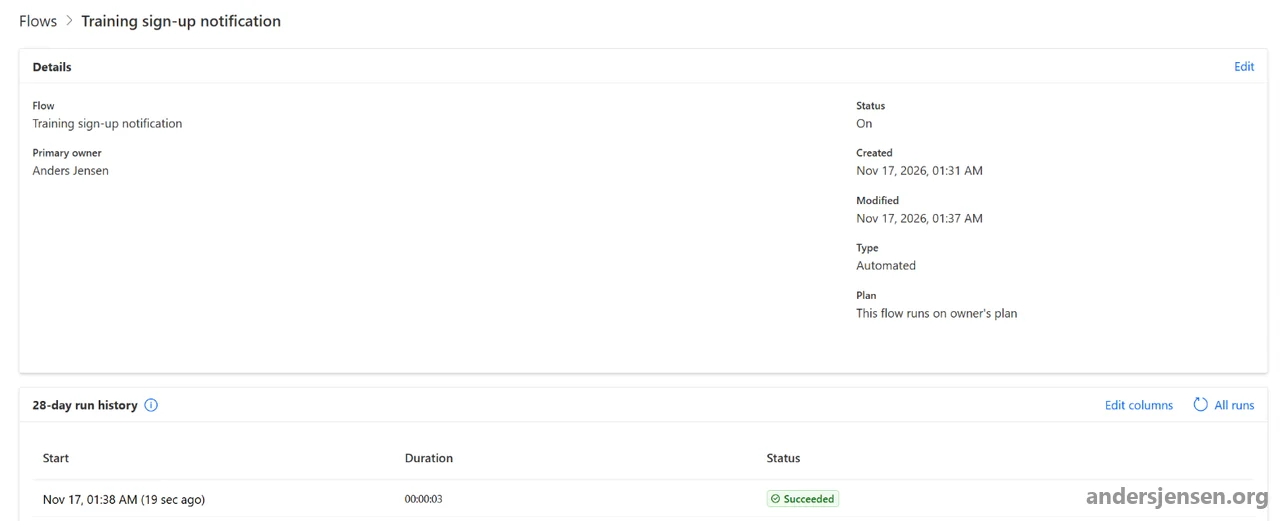
The solution now holds the flow, two connection references and three environment variables. The references and variables have ajorg_ in their technical names.

If you already have flows outside a solution
Flows made under Create in Power Automate, like the one in the guide to sending Granola summaries to Teams, often live outside a solution, especially in the default environment. There are two situations.
1. The flow is in dev, but outside a solution.
- Open the solution, and choose "Add existing" › "Automation" › "Cloud flow".
- Select the flow on the "Outside Dataverse" tab, and add it. Not every flow can be added.
- Check which connection references the flow uses. Power Automate creates an automatic connection reference when the flow is added, as in the image above. Use "Change connection reference" in the trigger and each action to choose your own.
- Replace fixed addresses with environment variables, publish the flow, and run it once.
- If the flow has also landed in another solution than the one you will export, remove it from that one with "Remove" › "Remove from this solution". This happens when another solution is set as preferred.

2. The flow is in the default environment and in use.
- Open the flow in the default environment, and choose "Save As". The dialog says "It'll be turned off by default". Check that the copy is "Off".
- Create an unmanaged solution with your publisher in the default environment. Add only the copy with "Add existing" › "Automation" › "Cloud flow" › "Outside Dataverse". Power Automate creates a connection reference by itself. Do not turn the copy on in the default environment.
- Export the solution as "Unmanaged". The copy stays "Off".
- Import the solution into dev, and choose the dev connection under "Connections". The flow is "Off" after the import.
- Switch the flow to dev resources: Your connection reference, and environment variables instead of fixed addresses. Only then turn it on, and run a test with made-up data.
- Deploy to test, and check the flow against test's own resources.
- In production: Pause new sign-ups, wait for all runs of the original flow to finish, and turn the original off. Deploy, check that the new flow is "On", send a test item through, and resume sign-ups.
- Delete the original once the new flow has run without errors.
The order in step 7 matters, because the import can turn the new flow on by itself.
Unmanaged and managed: Move the solution manually
Use unmanaged in dev, where you build, and managed everywhere else. A managed solution cannot be exported. If you delete one, all its components are removed, and data in its own tables and columns is lost.
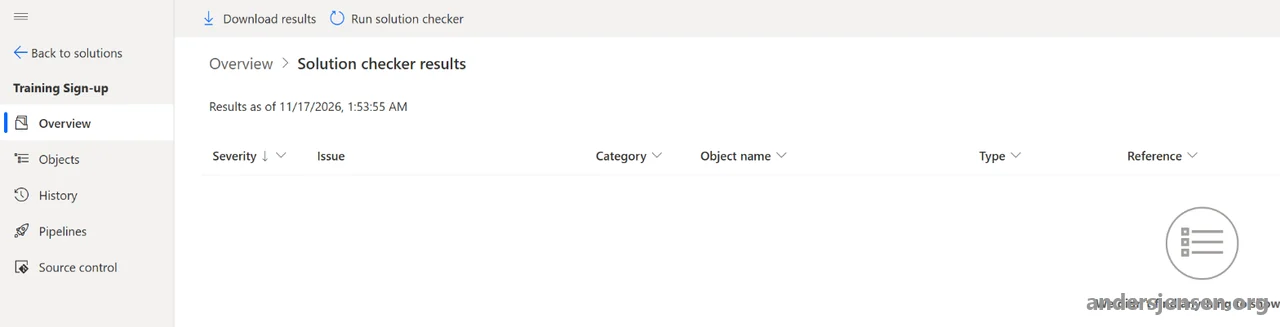
Start with solution checker:
- In "Solutions", choose "…" next to the solution › "Solution checker" › "Run".
- When it has finished, choose "View results".
Export from dev
- Select the solution, and choose "Export solution".
- Under "Before you export", click "Publish".
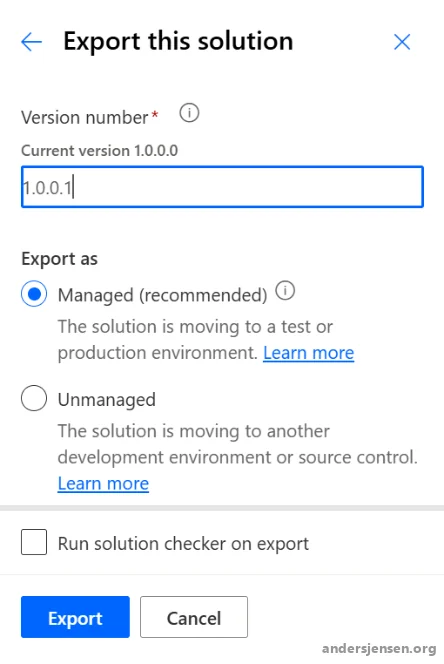
- Click "Next", keep the suggested version number (1.0.0.1), and choose "Managed (recommended)".
- Click "Export", and then "Download" when the export has succeeded.
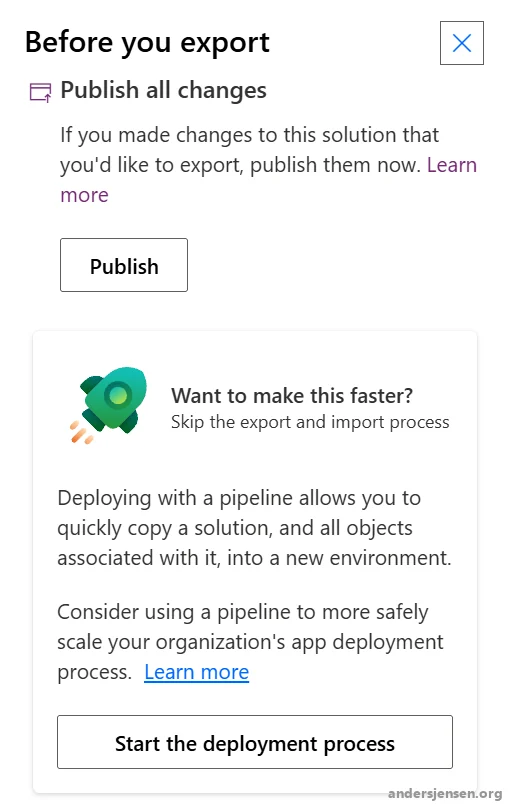
The first step also suggests a pipeline, and the next step has a checkbox for solution checker:
Import into test
- Switch to the test environment, and choose "Solutions" › "Import solution" › "Browse".
- Select the file, and click "Next".
- Choose connections for the connection references.
- Fill in the environment variables with test values. The site dropdown only lists sites you have visited, so type the site's URL if it is missing.
- Click "Import".
- On the flow's page, check that it is "On".
- Create an item in the test list, and check that the message arrives in Teams.
Next to the two connection references, the connections step asks for a SharePoint connection "Required for Environment Variables of type Data source SharePoint".
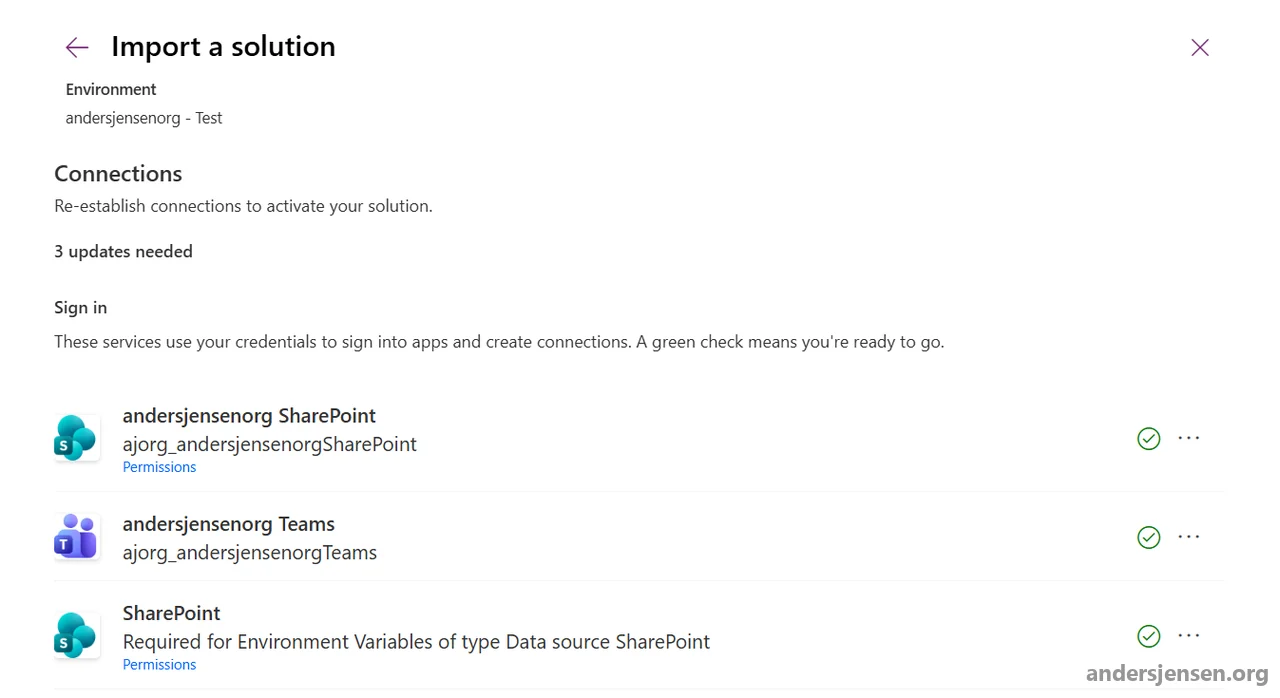
Variables without a value ask for one. A typed site URL can show a warning that you do not have access to the site value. The warning does not stop the import.
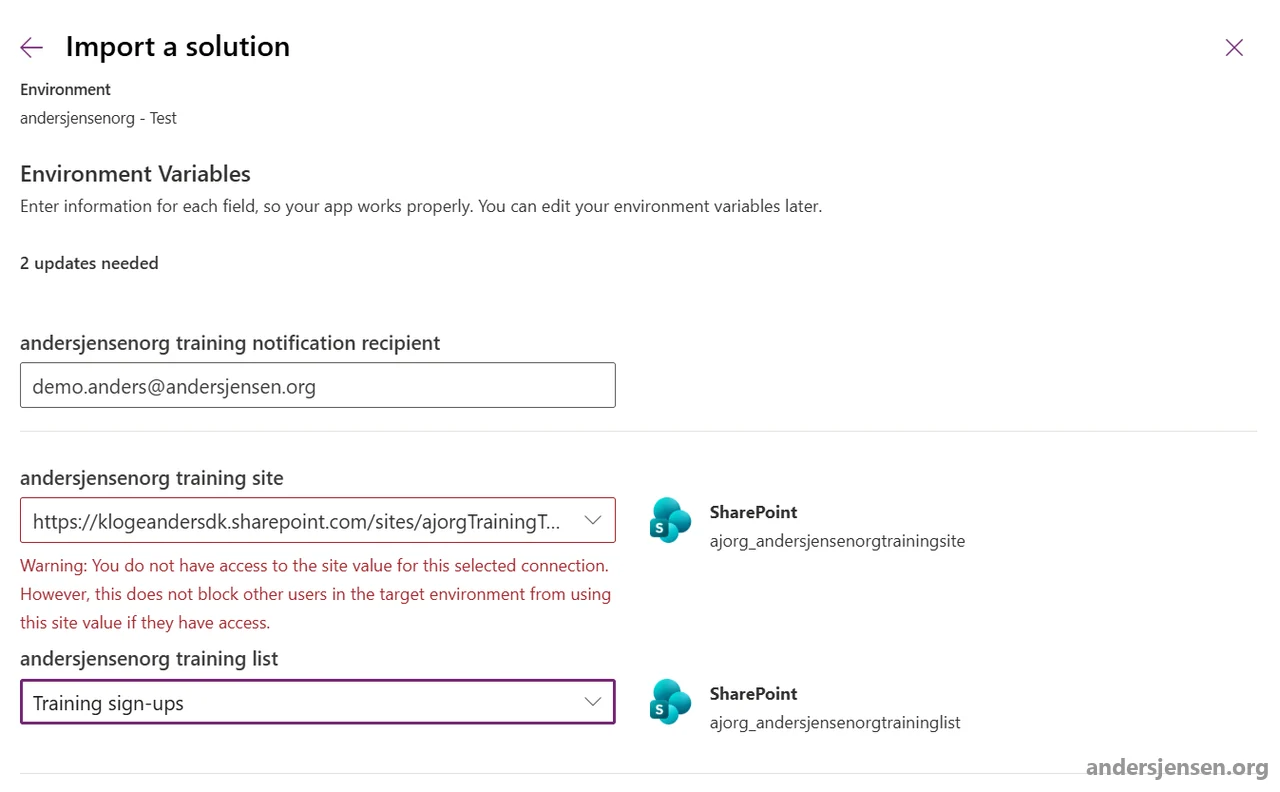
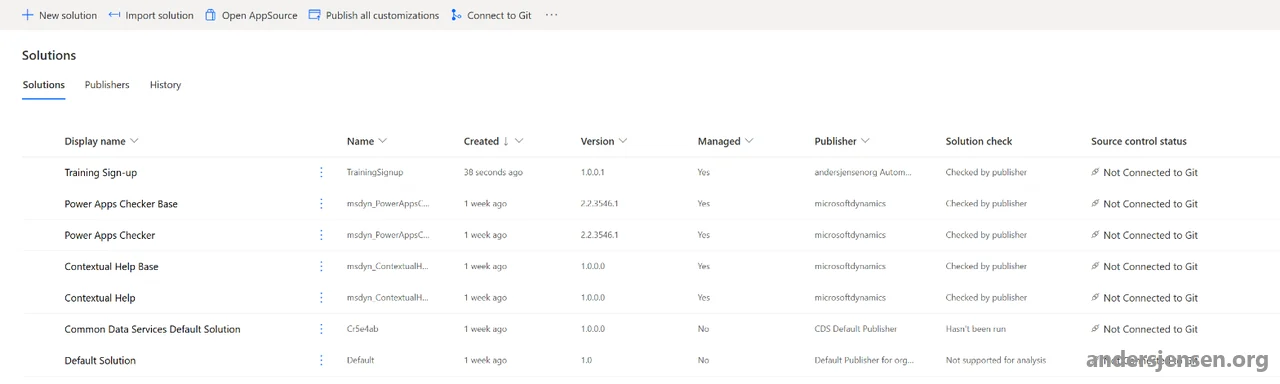
The import tries to put flows in the same state as at export. If the flow was on and every connection reference gets a connection, it should be turned on. Whoever imports becomes the owner of everything in the solution. An import without errors only proves the package arrived.
Never fix directly in test or production
A change to a managed component is stored as an unmanaged layer on top of the solution. The top layer decides what runs, so the change keeps applying after the next deployment. Microsoft writes that managed components cannot be edited inside the managed solution.
The new designer blocks editing the managed flow, but the classic designer allows it, with a banner saying the edit creates a new unmanaged layer. You see the layers on the flow under "Advanced" › "See solution layers":
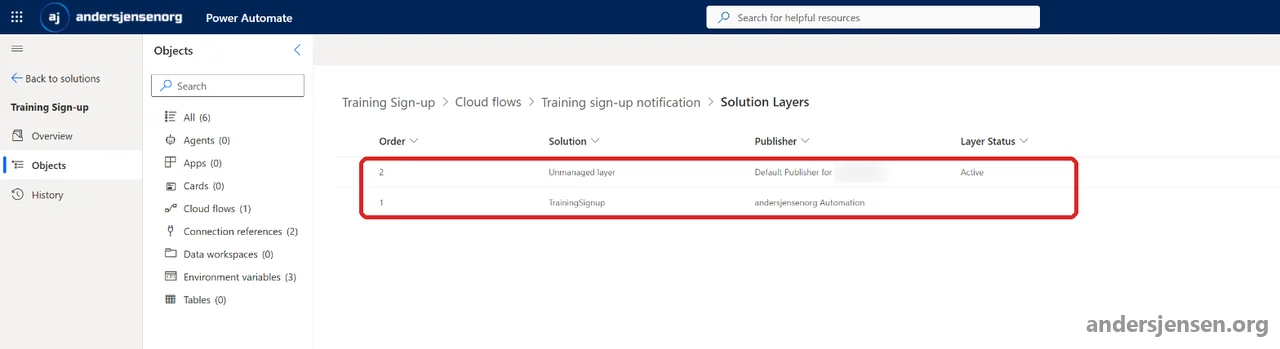
To remove the layer:
- In the solution, go to "Objects" › "Cloud flows", and select the flow.
- Choose "Advanced" › "Remove active customizations", and confirm.
It cannot be undone, and afterwards the flow runs as the managed solution says.
The next version: Update a solution you have already deployed
- Make the change in dev, and publish the flow.
- Export the solution as managed with a higher version number. The format is major.minor.build.revision, and the new version must be higher than the one in the target.
- Import the file in the target. The details show "Current version installed" and "Version contained in the update".
- Under "Advanced settings", choose one of the three solution actions in the table below, and click "Import".
- Check that the flow is "On", and create a test item.
The three actions:
| Action | What it does | Use it when |
|---|---|---|
| Upgrade (default) | Upgrades and deletes components that are no longer in the solution | Almost always. The target ends up like dev |
| Stage for upgrade | Installs the new version next to the old one and waits to delete until you choose "Apply Solution Upgrade" | You need to move data before the old parts go |
| Update | Replaces with the new version, but leaves removed components behind | Rarely. It is fastest, but test and production can drift from dev |
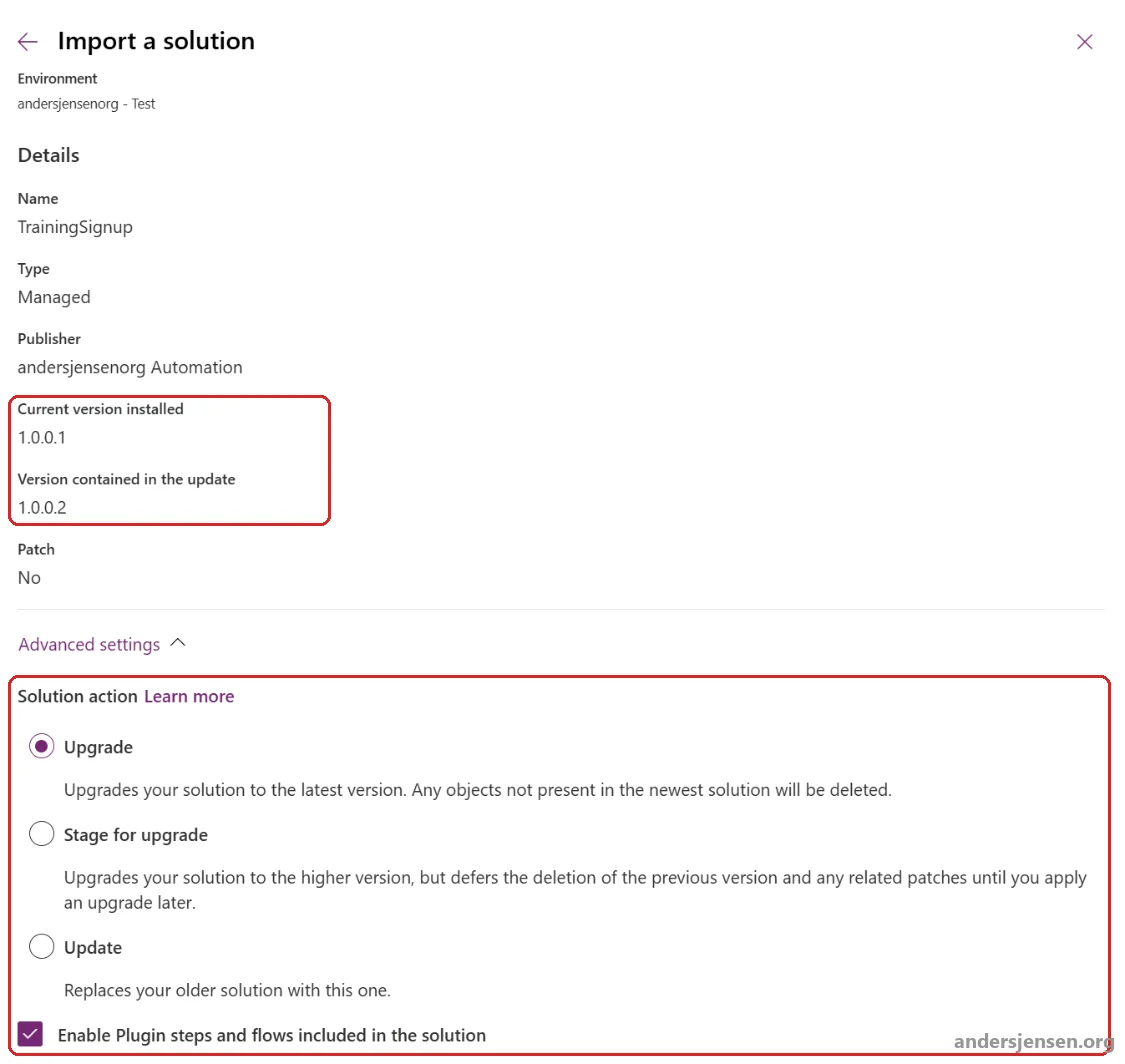
Microsoft's pages describe the flow's state differently. The page on updating solutions says the checkbox "Enable Plugin steps and flows included in the solution" turns the solution's flows on after the import. The older page on importing flows says an update does not change whether an existing flow is on. A yellow message about flows that may not be on can appear even when the flow is "On".
Microsoft's pages disagree on patches: The page on solution concepts recommends them for small updates, while the pages on layers and updates advise against them. Use full upgrades to keep team development and source control simple.
Pipelines in Power Platform
Pipelines automate the two previous sections from inside Power Automate or Power Apps. They always deploy managed solutions and always use Upgrade, and both the managed and the unmanaged version are stored in the pipeline host at every deployment.
What Pipelines require
- Dataverse: In every environment in the pipeline.
- Managed Environments for targets: Test and production must be managed. The host does not have to be.
- Development environment: Microsoft's pages differ. The Pipelines page still exempts developer environments from Managed Environments and standalone licences, although unmanaged ones are being phased out, and says "all other environments used in pipelines" must be managed. The platform host and custom host pages only require it for targets. A Sandbox dev environment that is not managed works with the platform host.
- Licences: Every managed environment requires licences with premium use rights, and in Microsoft's example a production target requires a standalone licence.
- Enforcement: Since October 2026, admins are notified when a pipeline deploys to a target that is not managed. They then have 30 days, plus one 30-day extension per environment, before deployments to that target are blocked.
Platform host or custom host
With the platform host, a maker can create a personal pipeline without an admin. The target list only shows environments the maker can already import to. A personal pipeline has at most three environments (dev and two targets), cannot be shared and cannot be extended. The platform host is created the first time someone in the tenant opens Pipelines.
The host sits in the tenant's home region. If your environments are elsewhere, an admin must turn on "Cross-Geo Solution Deployment". A custom host is the admin's central setup with shared pipelines, more environments and the roles Deployment Pipeline Administrator, Maker and User.
Create and run a pipeline
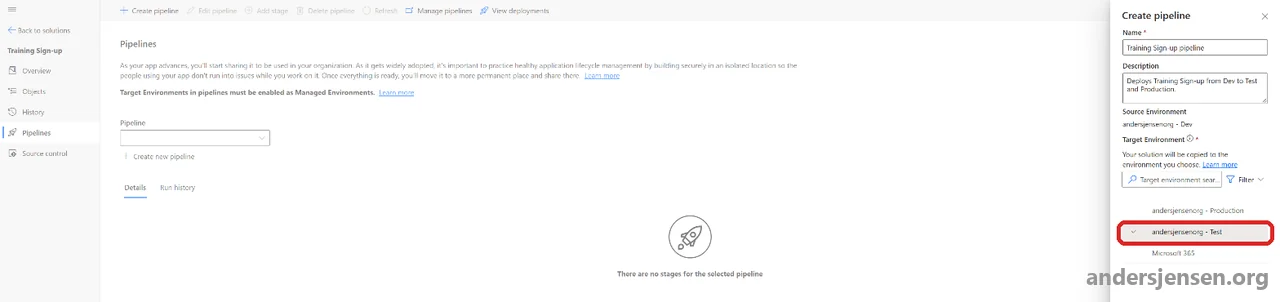
- Open the solution in dev, and choose "Pipelines" › "Create pipeline".
- Enter a name and description, choose test as "Target Environment", and save. The first stage is named after the environment.
- Choose "Add stage", name it "Production", and choose the production environment.
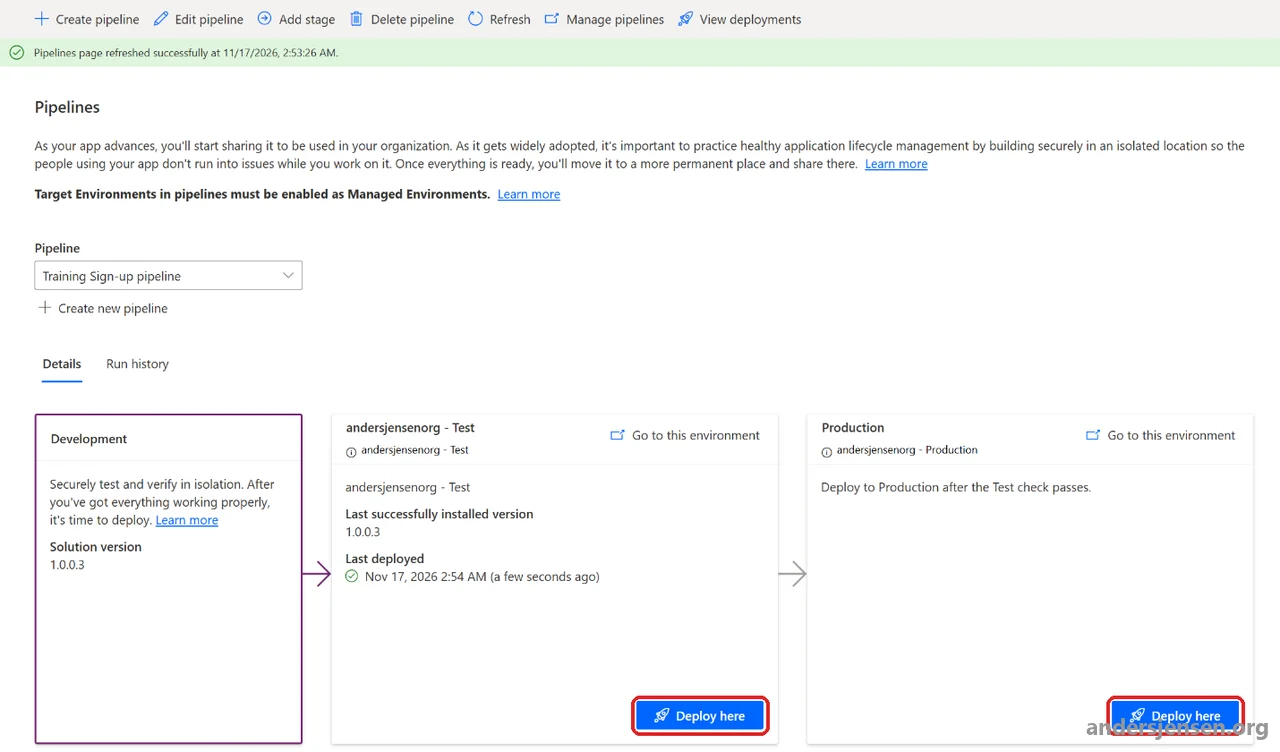
- Click "Deploy here" on the test stage, and choose "Now" or "Later".
- Wait for the validation.
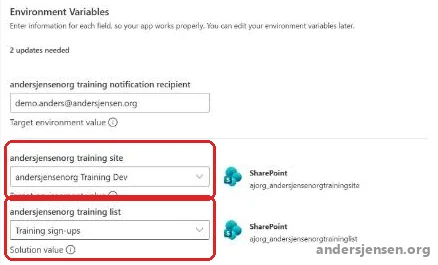
- Check connections and environment variables. If the site and list show dev values marked "Solution value", change them to the target's own.
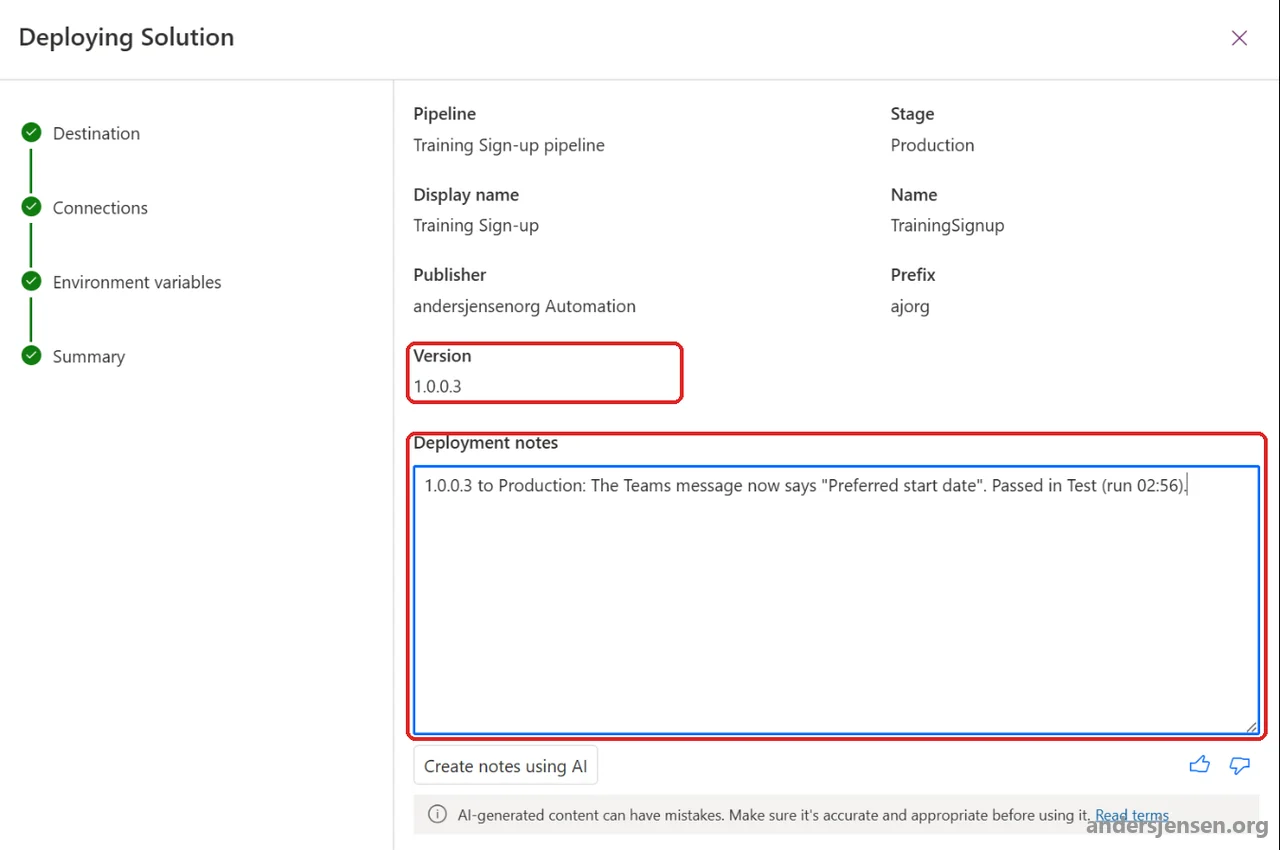
- Check the deployment notes in the summary, and click "Deploy".
- Follow the deployment under "Run history".
- Create an item in that environment's list, and check that the message arrives in Teams.
- Repeat steps 4 to 9 on the production stage.
Stages run in order, and the version deployed to test goes to production. "Deploy here" on the production stage is greyed out until test is deployed, and the version cannot be edited there.
When dev values travel in the solution, the pipeline pre-fills them:
The "Destination" step announces an AI-generated description, and the "Summary" step pre-fills the deployment notes with AI text, plus "Clear" and "Create notes using AI".
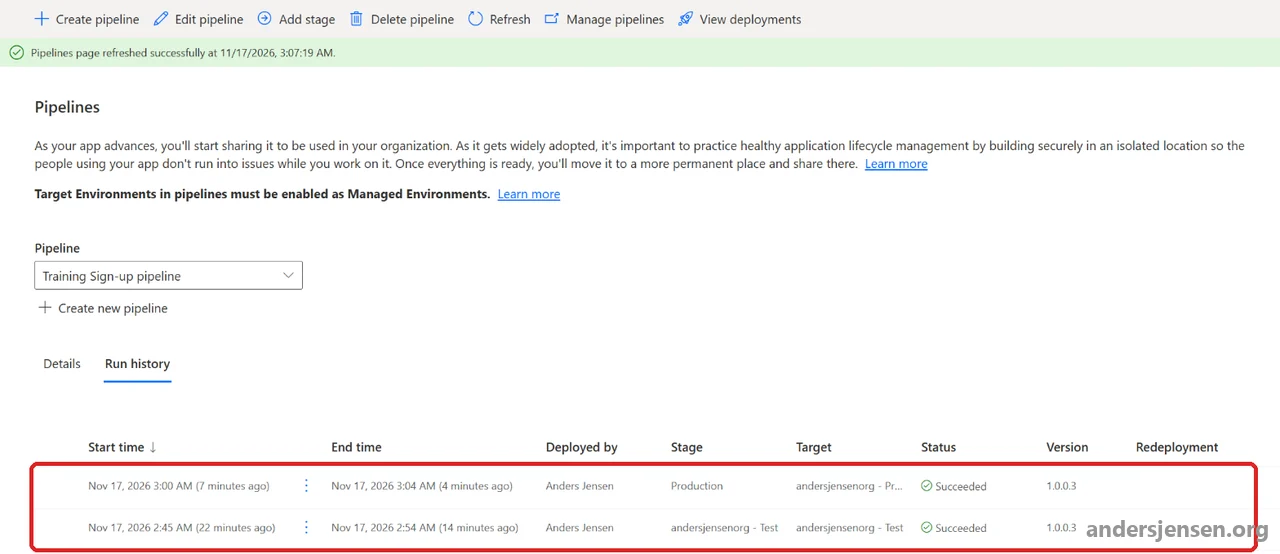
Limits
- One solution per deployment.
- Same tenant only.
- No unmanaged deployments.
- Rollback: An earlier version can be redeployed from "Run history" if "Allow redeployments of older versions" is on. It overwrites the newest version and cannot be undone.
For approvals, Pipelines offer delegated deployments, which run as a service principal or the stage owner and always wait for approval. Run as the stage owner, they cannot deploy connection references to OAuth connections like the example's.
When you grow: Git, Azure DevOps and GitHub
Git integration stores the solution as code in Azure DevOps or GitHub. Microsoft writes that it belongs in development environments, and that both development and target environments must be Managed Environments. At the time of writing, the GitHub connection is in preview.
"Connect to Git" in the toolbar of the "Solutions" list opens a panel for Azure DevOps. It says that connecting turns on Managed Environments, so it is not a free click in dev.
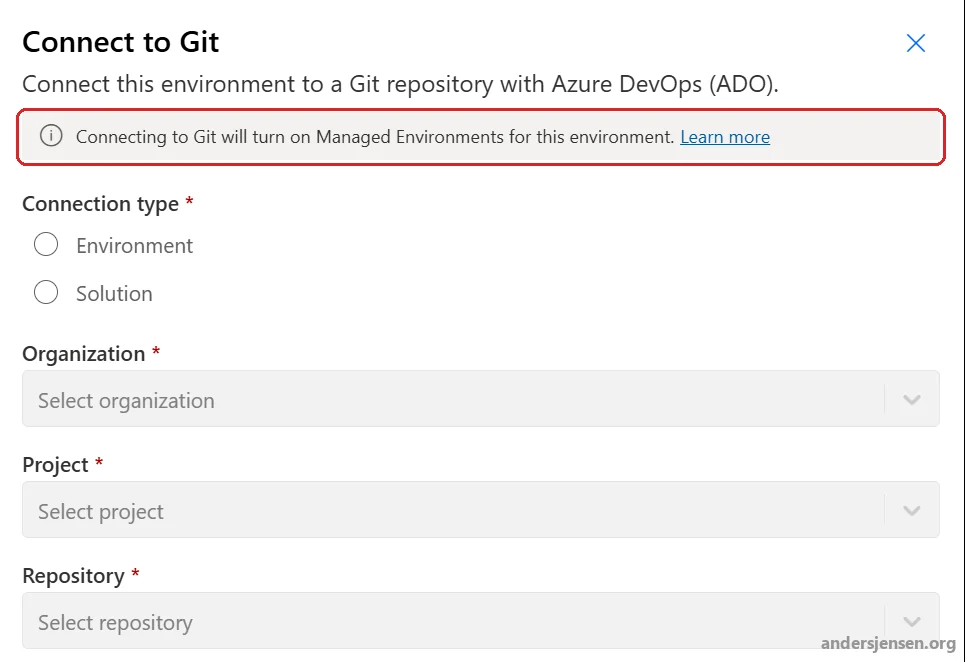
Pipelines can be extended to GitHub and other systems, and everything can be built with Power Platform Build Tools for Azure DevOps or with GitHub Actions. A deployment settings file, created with pac solution create-settings, holds connection references and environment variables per environment as JSON, and Build Tools use it at import.
Ownership and service principal
Three things depend on the owner:
- Ownership: Who can edit and manage the flow.
- Licence: The flow runs on the owner's plan.
- Connections: The sign-ins the actions use.
When the owner leaves, an extra co-owner saves the ownership, not the licence or the connections (see the FAQ).
Add a group as co-owner
- On the flow's page, click "Share" next to "Co-owners".
- Search for the group, and select it. A Microsoft 365 group works.
- Read the dialog, which says co-owners get to use the flow's connections, and confirm.
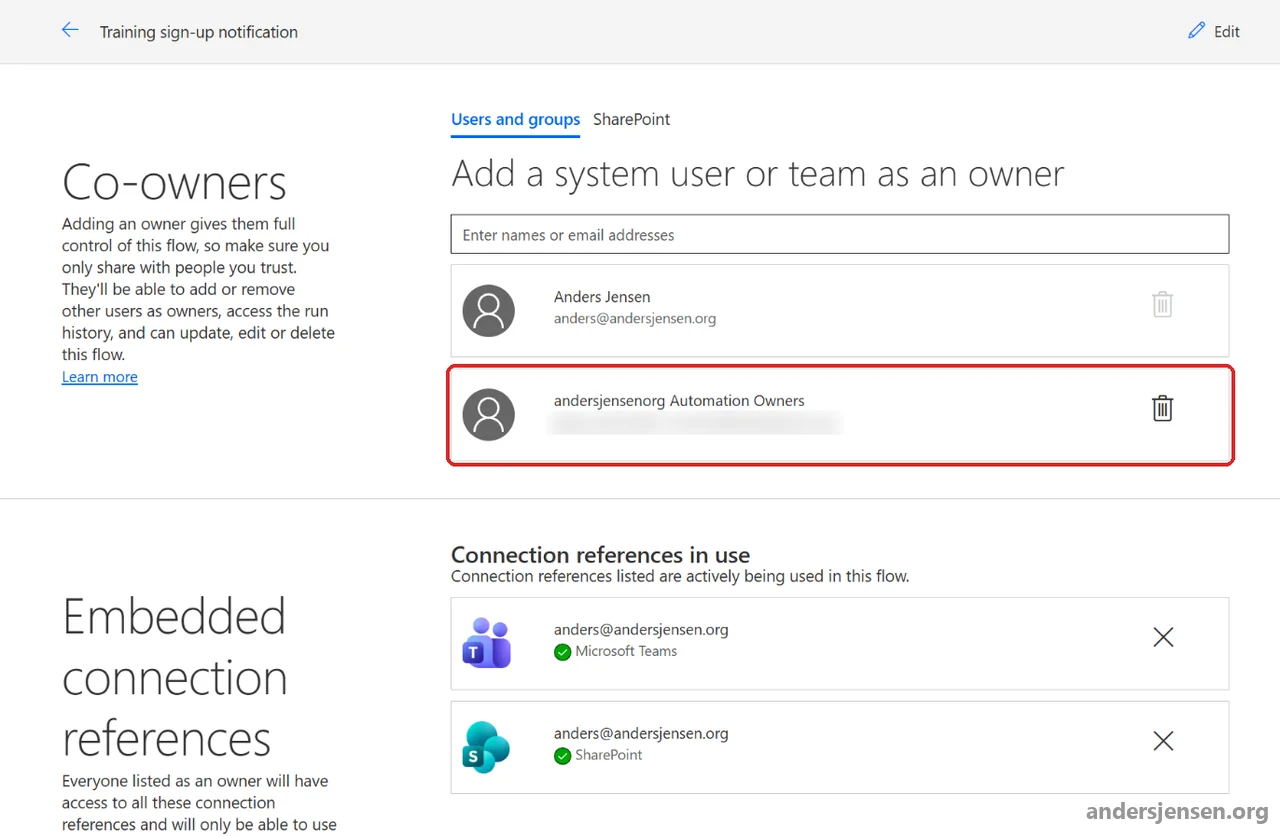
Outside the default environment, group members do not automatically get the Environment Maker role, so what they can do depends on the roles they already have.
Change the owner
An owner or co-owner with the right permission can change the owner of a solution flow, and the old and new owner both become co-owners:
- On the flow's page, choose "Set primary owner" on the "Co-owner" card.
- Choose the new owner under "Primary owner", and click "Save".
- Confirm in the "Change owner?" dialog.
An admin finds flows with no owner in the Power Platform admin center under the environment's "Resources" › "Flows".
A service principal as owner
A service principal is an application identity in Microsoft Entra ID, added to the environment as an application user. Microsoft recommends it as flow owner rather than a shared service account, because shared passwords are a security risk.
Before you start: Settle and document the licence for the flow (see the licence question below).
- Create an app registration in Microsoft Entra ID. Owning the flow does not require a client secret.
- In the Power Platform admin center, open the production environment, and go to "Settings" › "Users + permissions" › "Application users" › "New app user".
- Add the app, choose the business unit and a role such as System Customizer, and click "Create".
- On the flow's page, make the service principal primary owner.
- Create a test item in the production list, and check that the run shows "Succeeded" and the Teams message arrives.
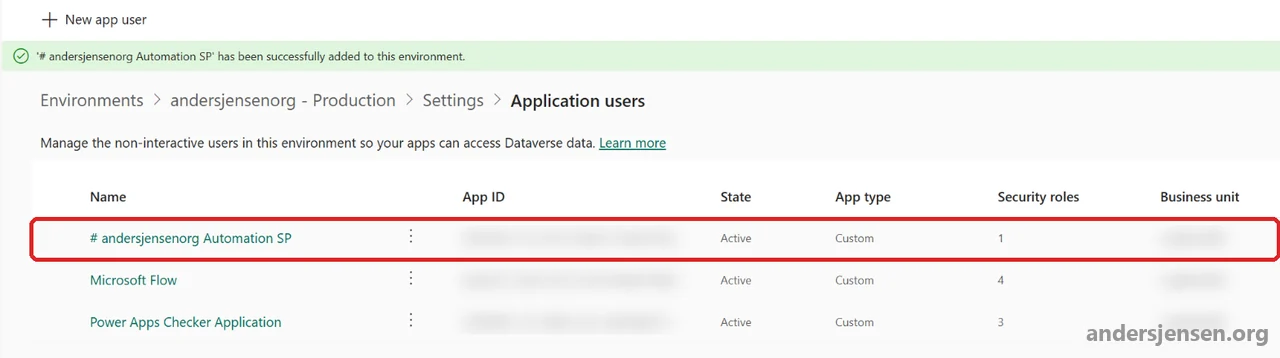
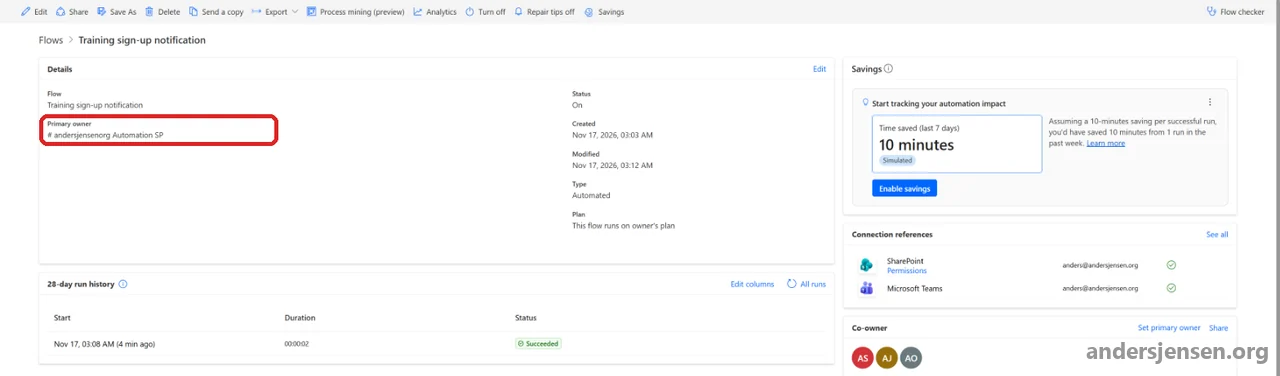
If you switch the owner back to a user, the service principal stays on the list of co-owners. If it should not keep access:
- On the flow's page, click "Share" next to "Co-owners".
- Remove the service principal.
SharePoint and Teams still sign in through the user connections that the connection references point to. Create those with an account that does not leave with an employee and only has the permissions the flow needs.
Microsoft's pages differ on sharing those connections with the service principal. The page on service principals says sharing is not required for a solution flow, while the page on changing owners lists sharing as a general step. A solution flow runs with the service principal as owner without the sharing.
The licence question
A service principal cannot hold a licence. If it owns a flow with premium connectors, the flow needs a Process or per flow licence, a flow group with a Process licence or a designated licensed user. Flows with only standard connectors are exempt from that requirement.
The requirement for Managed Environments is on another page, which does not mention service principals. So settle the licence first. A successful run right after the change proves little: Moving to the new owner's licence can take up to seven days, and a flow whose new owner lacks a needed premium licence runs for 30 days and is then turned off.
Licensing in brief
For prices, see Microsoft's Power Platform licensing guide.
- Power Automate Premium per user: Standard, premium and custom connectors.
- Power Automate Process per flow: Gives the flow its own rights regardless of the owner's licence. The flow must be in a solution first.
- Managed Environments: Every user running a cloud flow in a managed environment needs Power Apps Premium, Power Automate Premium or a qualifying Dynamics 365 licence, or the environment needs a per flow plan allocated. Microsoft has only dated the block for apps: From February 2027, users without a licence cannot open apps in a managed environment.
- Action limits: From April 2027, a phased rollout ends the transition period for cloud flows under user licences, and the published per-user limits apply. Existing Process and per flow allocations are not affected.
So even this example, with only standard connectors, needs a premium licence or per flow capacity once it runs in managed test and production.
Governance and monitoring
Data policies
Data policies (DLP policies) sort connectors into Business, Non-business and Blocked. Connectors in different groups cannot be combined in one flow, and an environment policy cannot override a tenant policy. They sit in the Power Platform admin center under "Security" › "Data and privacy" › "Data policy".
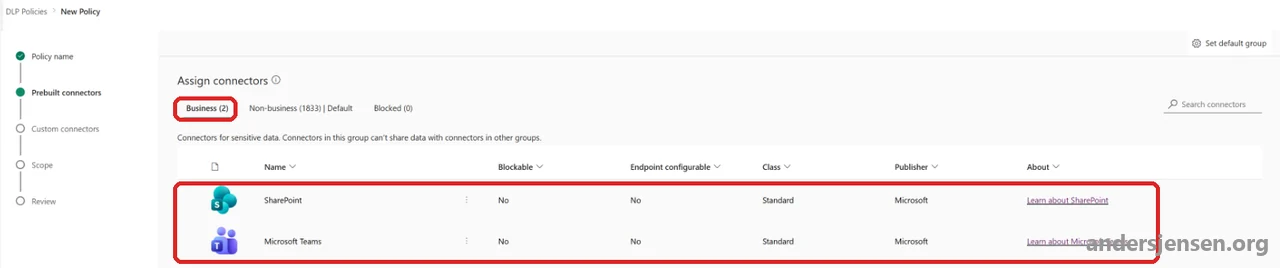
Managed Environments
Managed Environments add control per environment, for example sharing limits, usage insights, solution checker enforcement, Pipelines and export to Application Insights. Turning them on requires the Power Platform Administrator or Dynamics 365 Administrator role:
- In the Power Platform admin center, go to "Manage" › "Environments" › "…" next to the environment › "Enable Managed Environments".
- Read the panel. It says a licence auto-claim policy will be created for the tenant if none exists, so tell whoever manages licences in Microsoft 365.
- Click "Enable".
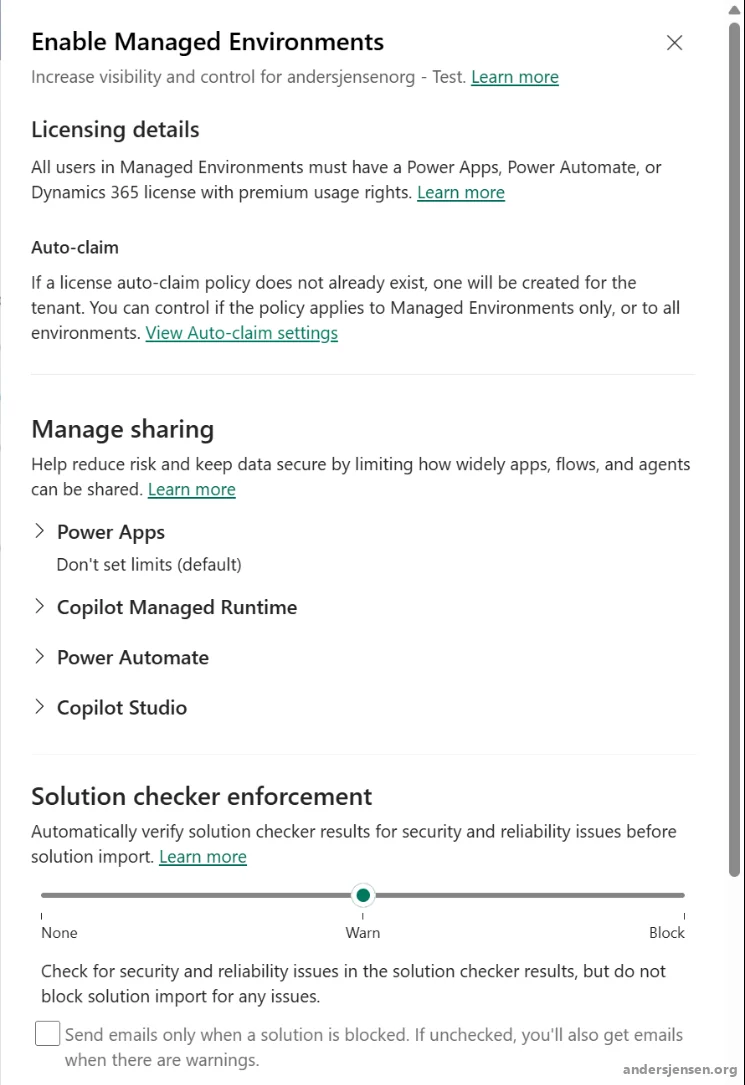
Solution checker and blocking direct changes
Solution checker is a static check against Microsoft's rules for unmanaged solutions. In managed environments it can be set to None, Warn or Block at import, and it does not guarantee a successful import.
The environment setting "Block unmanaged customizations" stops changes directly in the environment, which enforces the rule about never fixing in production. Flows can still be turned on and off, and environment variables can still be changed. It is off by default, under "Settings" › "Product" › "Features".
Monitoring
Run history is kept for 30 days (limits page). The flow's details page calls the list "28-day run history". Flows not triggered for 90 days can be turned off, with a warning to the owners 30 days before, unless the owner has a premium licence or the flow has a Process licence. Flows that fail constantly are turned off after 14 days.
| Where | What you see | Keep in mind |
|---|---|---|
| The flow's run history | Every detail of each run | 30 days |
| The FlowRun table in Dataverse | Key data for runs of solution flows. Automation center builds on it | 28 days by default. Longer retention uses Dataverse database capacity. Microsoft writes that records can be skipped, so it is not a complete audit trail |
| Application Insights | Telemetry for alerts and dashboards | Requires Managed Environments. Microsoft writes that small data losses can occur |
Apps, agents and desktop flows: The same method
Canvas apps, Copilot Studio agents and desktop flows can live in the same kind of solution and move with export and import or Pipelines.
Copilot Studio creates agents in a default solution. To move an agent, put it in your own solution, and add components you give the agent later in Copilot Studio to the solution before you export. Building the agent itself is covered in build your first agent in the new Copilot Studio. For desktop flows, Microsoft's role overview lists System Customizer as the role that can create them.
Common pitfalls
- Flows in the Default Solution. It cannot be exported.
- The default publisher. Its random prefix ends up in every technical name.
- Automatic connection references with random names.
- Dev values travel to test. Remove current values before export.
- Fixes directly in production. They stay as a layer on top of the next deployment.
- The SharePoint list is missing in test, or its internal column names differ. The import succeeds, but the flow fails.
- No licence for flows in managed test and production. It is required even with standard connectors.
- One person owns every production flow.
- The flow will not turn on after import. The person turning it on lacks access to a connection.
- "Update" chosen at import. Deleted parts stay behind in test and production.
Checklist
- Dev, test and production with Dataverse. Test and production as Managed Environments.
- Your own publisher, prefix and preferred solution.
- One connection reference per connector, and environment variables for everything that differs per environment, with no current values in the export.
- Sites, lists and connections ready in test and production, with the lists copied from the dev list.
- Solution checker without critical issues.
- A pipeline with test and production as targets, or a manual export as managed.
- A new version number for every deployment, and Upgrade at import.
- Target values checked for every environment variable, the flow On and a test item through after every deployment.
- A service principal as owner in production, or at least one more co-owner.
- A licence for flows in managed environments, and Process where required.
- A data policy that allows the flow's connectors.
- Your own log, FlowRun or Application Insights, if history must be kept beyond 30 days.
My recommendation
Start with three environments, one publisher, one solution and Pipelines with the platform host. That is enough for most teams.
Spend your effort on connection references, environment variables and ownership from the first flow. They cause the trouble when a flow moves, and are much harder to add later.
Wait until you have several developers or need code review before you introduce Git and Azure DevOps. Managed Environments need flow licences in test and production, so work out the cost before you choose Pipelines.
Frequently asked questions
What is the difference between a connection and a connection reference?
A connection is the sign-in itself, for example your SharePoint account, and it never travels with a solution. A connection reference lives inside the solution and points to a connection. When you import the solution into a new environment, you choose which connection it should point to there.
What is the difference between a managed and an unmanaged solution?
An unmanaged solution is the one you build and edit in, and it belongs in dev. A managed solution is the finished package you export to test and production. It cannot be exported again, and if you delete it, everything it contains is removed.
Do Power Platform pipelines require Managed Environments?
Yes, for the target environments. Test and production must be Managed Environments, while the host does not have to be. Microsoft's pages differ on the dev environment, but a Sandbox dev environment that is not managed works with the platform host. Flows in a managed environment must be covered by a premium licence or by per flow capacity.
Can I edit a flow directly in production?
You should not. The change is stored as an unmanaged layer on top of the solution and keeps winning, even after you deploy a new version. Make the change in dev, and deploy a new version.
What is the difference between Upgrade and Update when I import a new version?
Upgrade is the default. It updates the solution and deletes the parts you have removed in dev. Update also updates, but leaves removed parts behind in the target environment. Pipelines always use Upgrade.
What happens to a flow when the owner leaves?
Microsoft's licensing FAQ says the flow is downgraded, the owners are notified, and the flow is turned off after 14 days if nobody acts. Microsoft's page on shared flows says a flow with another active owner keeps running, but actions that use the departed owner's connections can fail. So a co-owner saves the ownership, while the licence and the connections need their own solution.
How long does Power Automate keep run history?
For 30 days from the start of the run. If you need to look further back, solution flows can store the key data of each run in Dataverse, the flow can write to its own log, or you can send telemetry to Application Insights, which requires Managed Environments.
How do I move a flow that is not in a solution?
Open a solution in the same environment, and choose "Add existing" › "Automation" › "Cloud flow" and the "Outside Dataverse" tab. Add the flow, and make sure it uses your own connection references. Then export the solution and import it in the next environment. If the flow is in use, move a copy that is turned off, and turn off the original before the new one goes live.
For the full picture, Microsoft's overview of ALM in Power Platform and overview of Pipelines are the primary sources.
Your own setup will raise questions this guide does not cover. Microsoft Power Automate Professionals is an active LinkedIn group where people who build flows every day ask and answer exactly those questions.